Facebook Login Configuration
Overview
Facebook Login Configuration will be done in three steps:
A. Create your Facebook App
Create an app in the Facebook Developer portal and add Facebook Login capability.B. Configure iOS
Configure your Facebook app to support iOS based on Bundle ID.C. Configure Android.
Configure your Facebook app to support Android based on Package Name and signing key.
Already have a Facebok app?
If you already have an existing Facebook app you may skip to iOS Configuration or Android Configuration configuration steps below.**
A. Create your Facebook App
Step A1. Create an App
Required parameters
You will need to make note of the following parameters from your Facebook app configuration:
- App Id and Display Name (found in Step A2)
- Client Token (found in Step A4)
(i) Log into your Facebook Developer Account After logging in, click "My Apps".
(ii) Click “Create App". Select "Consumer" in the following step and click "Next".
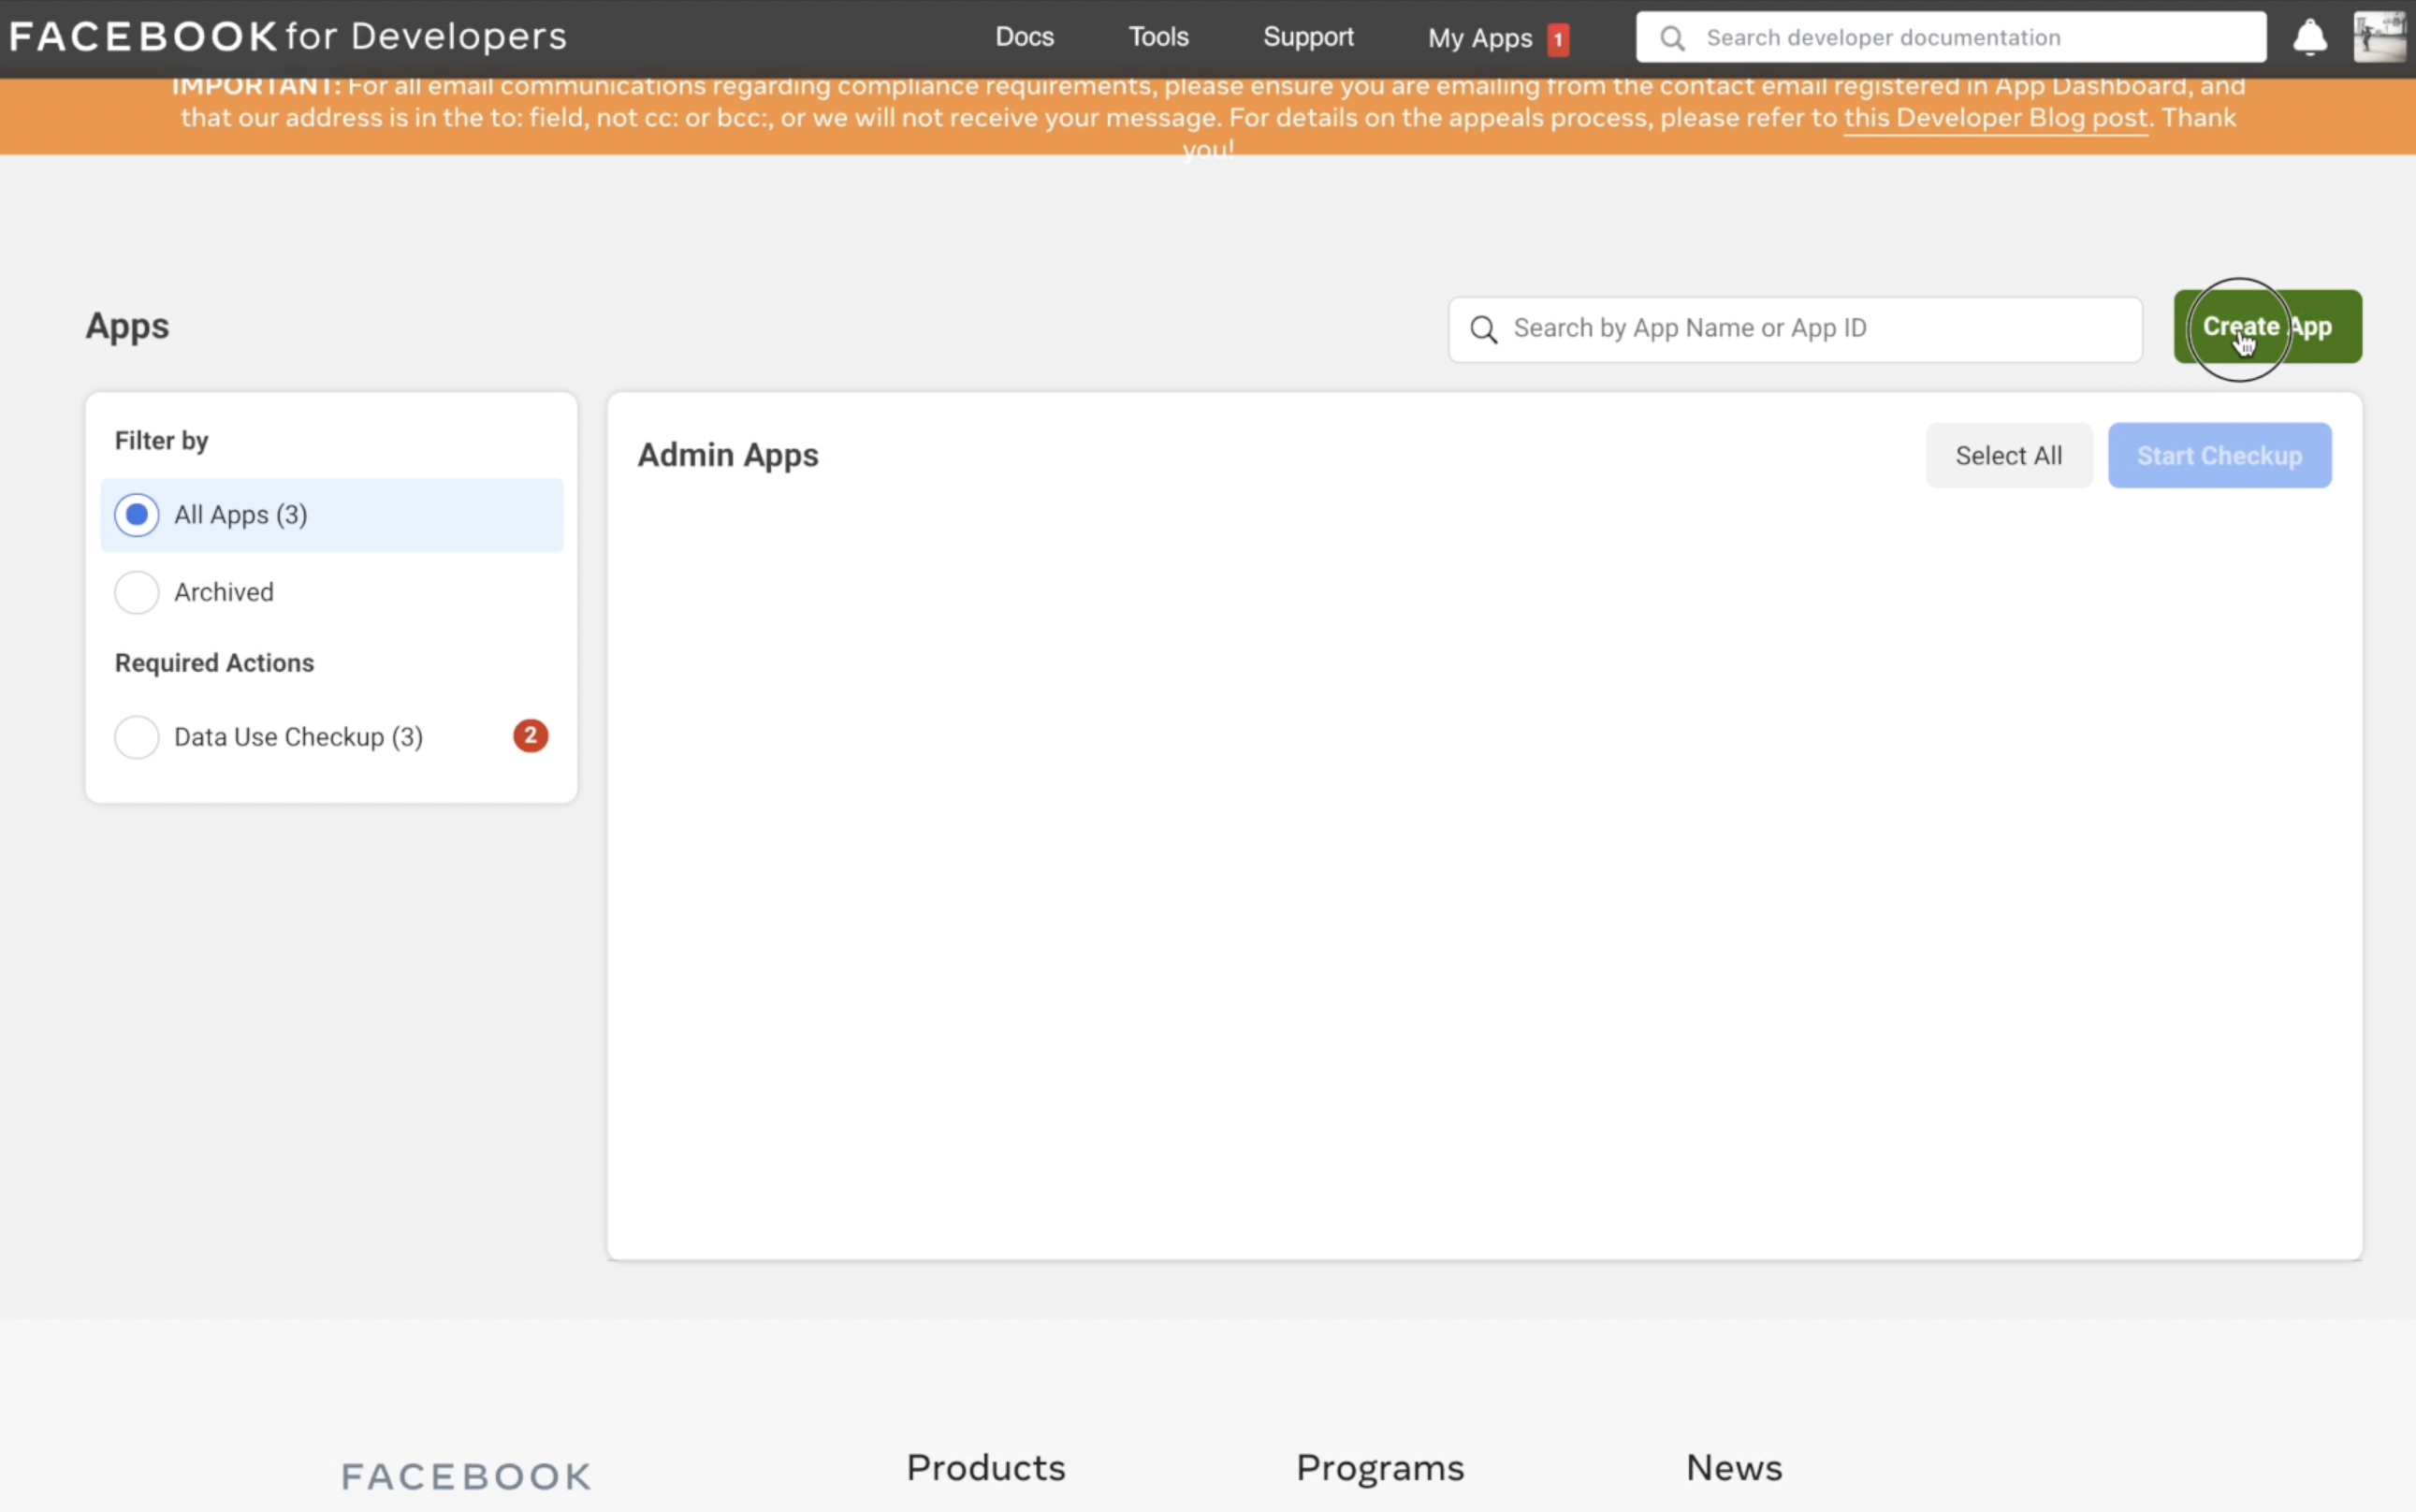
Click “Create App" and then select "Consumer" in the following step.
(iii) Add a descriptive "Display Name", which will be shown when your users complete the login process.
(iv) Add an "App Contact Email".
(v) Finally, click “Create App”.
Step A2. Make note of App ID and Display Name
App ID and Display Name
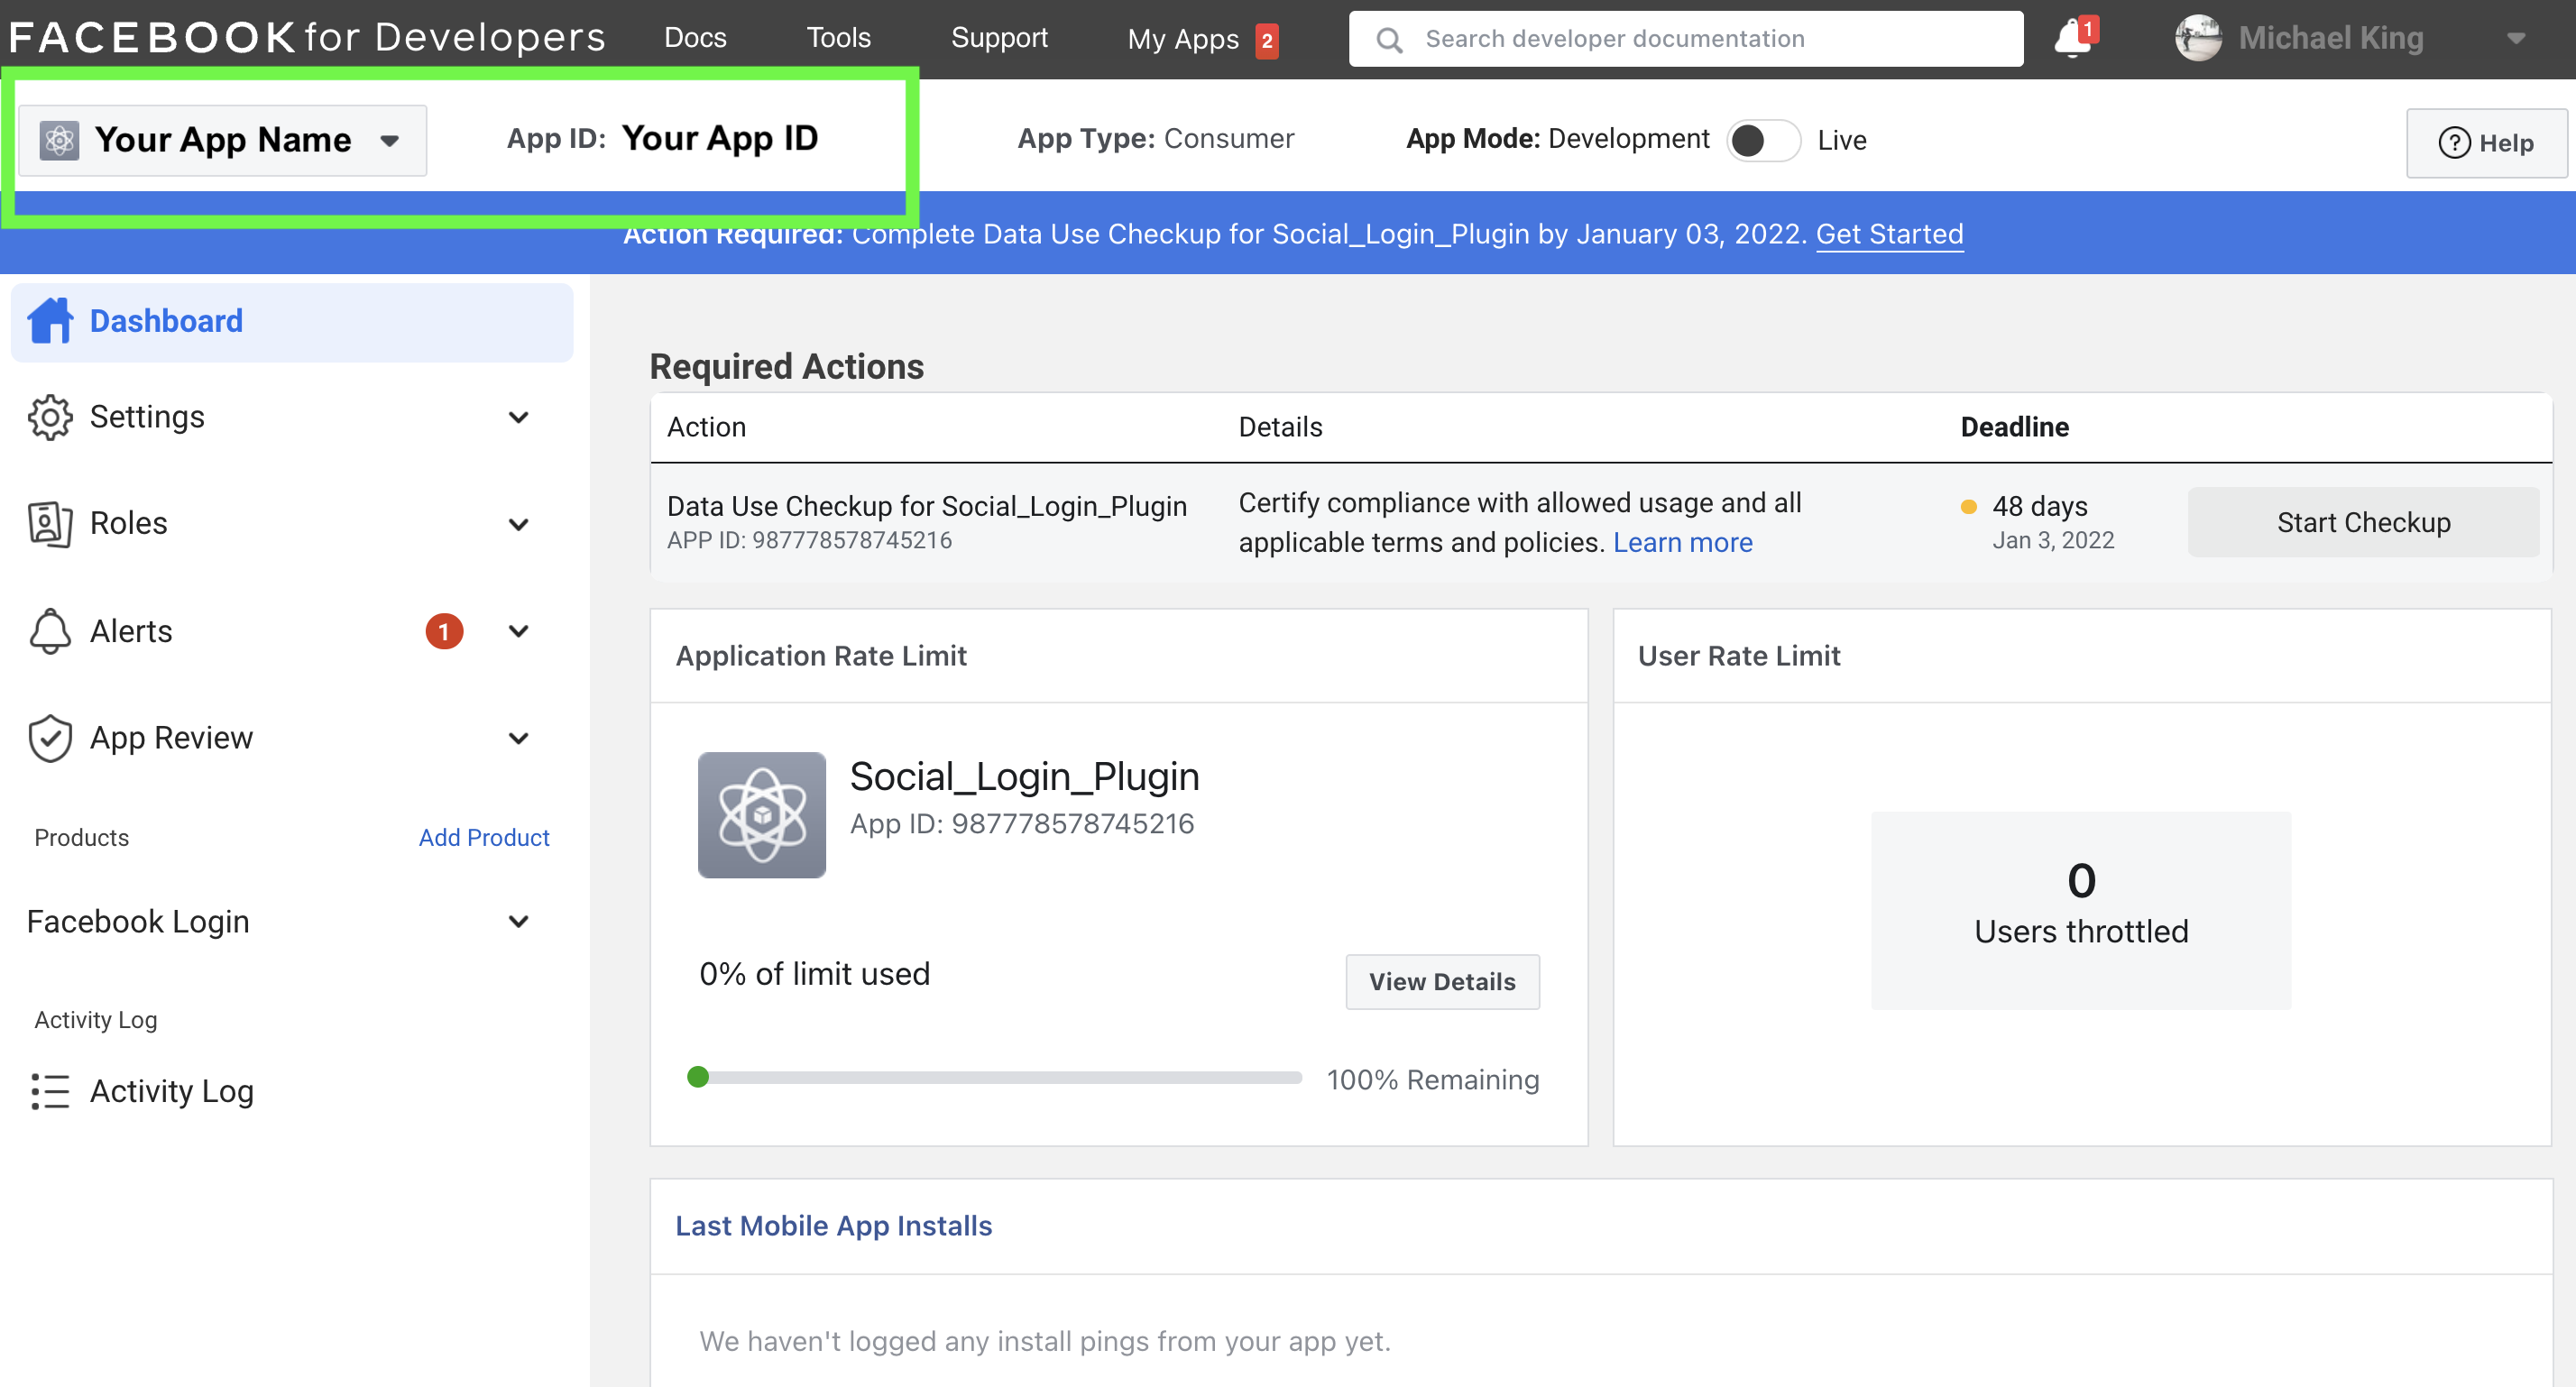
At this point you should be able to see the Display Name and App ID in the top left corner of your window. The location is indicated in the image below in the green box below.
Step A3. Configure Facebook Login
There are two main steps for this:
(i) Configure access for your app.
(ii) Configure Valid OAuth Redirect URIs and Allowed Domains for JavaScript SDK.
(i) Adjusting the access settings for your app.
In the left nav bar, expand "Facebook Login" and then choose "Settings". Notice there is a red notification at the top of the window. It indicates that your app has "Standard Access to public_profile". This should be set to "Advanced Access" as follows:
- (a) Within the notification, click the "Get Advanced Access" link in blue text.
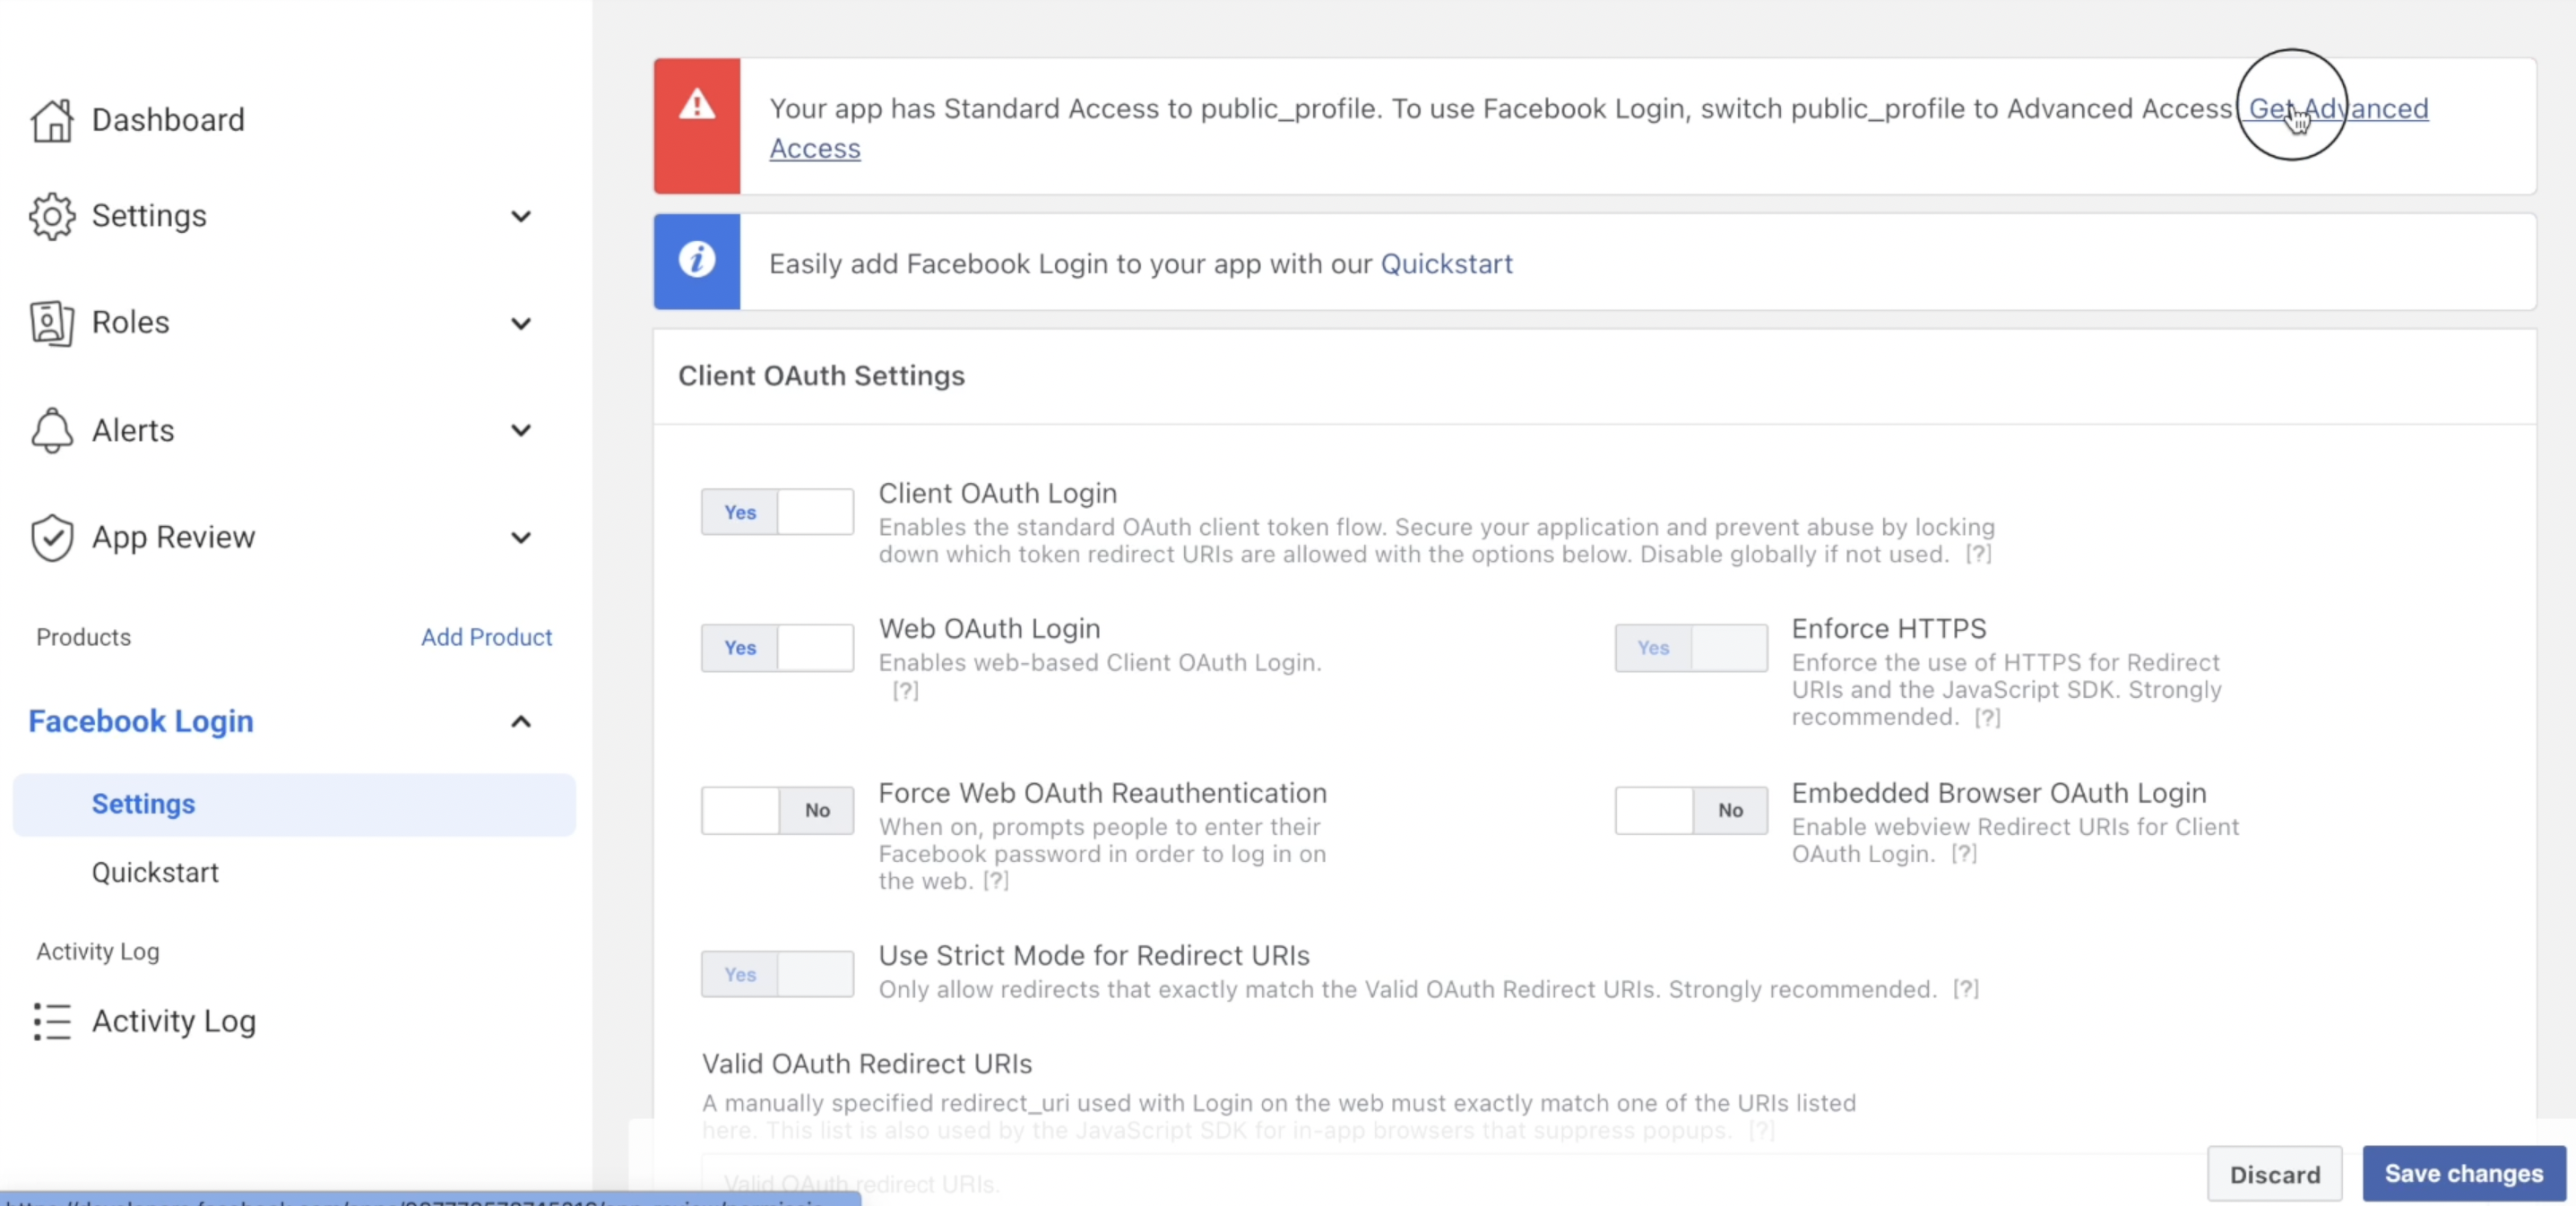
Click "Set Up" in the Facebook Login box, Settings from the left side bar.
- (c) Then, find "public_profile" in the first column of the Permissions and Access table.
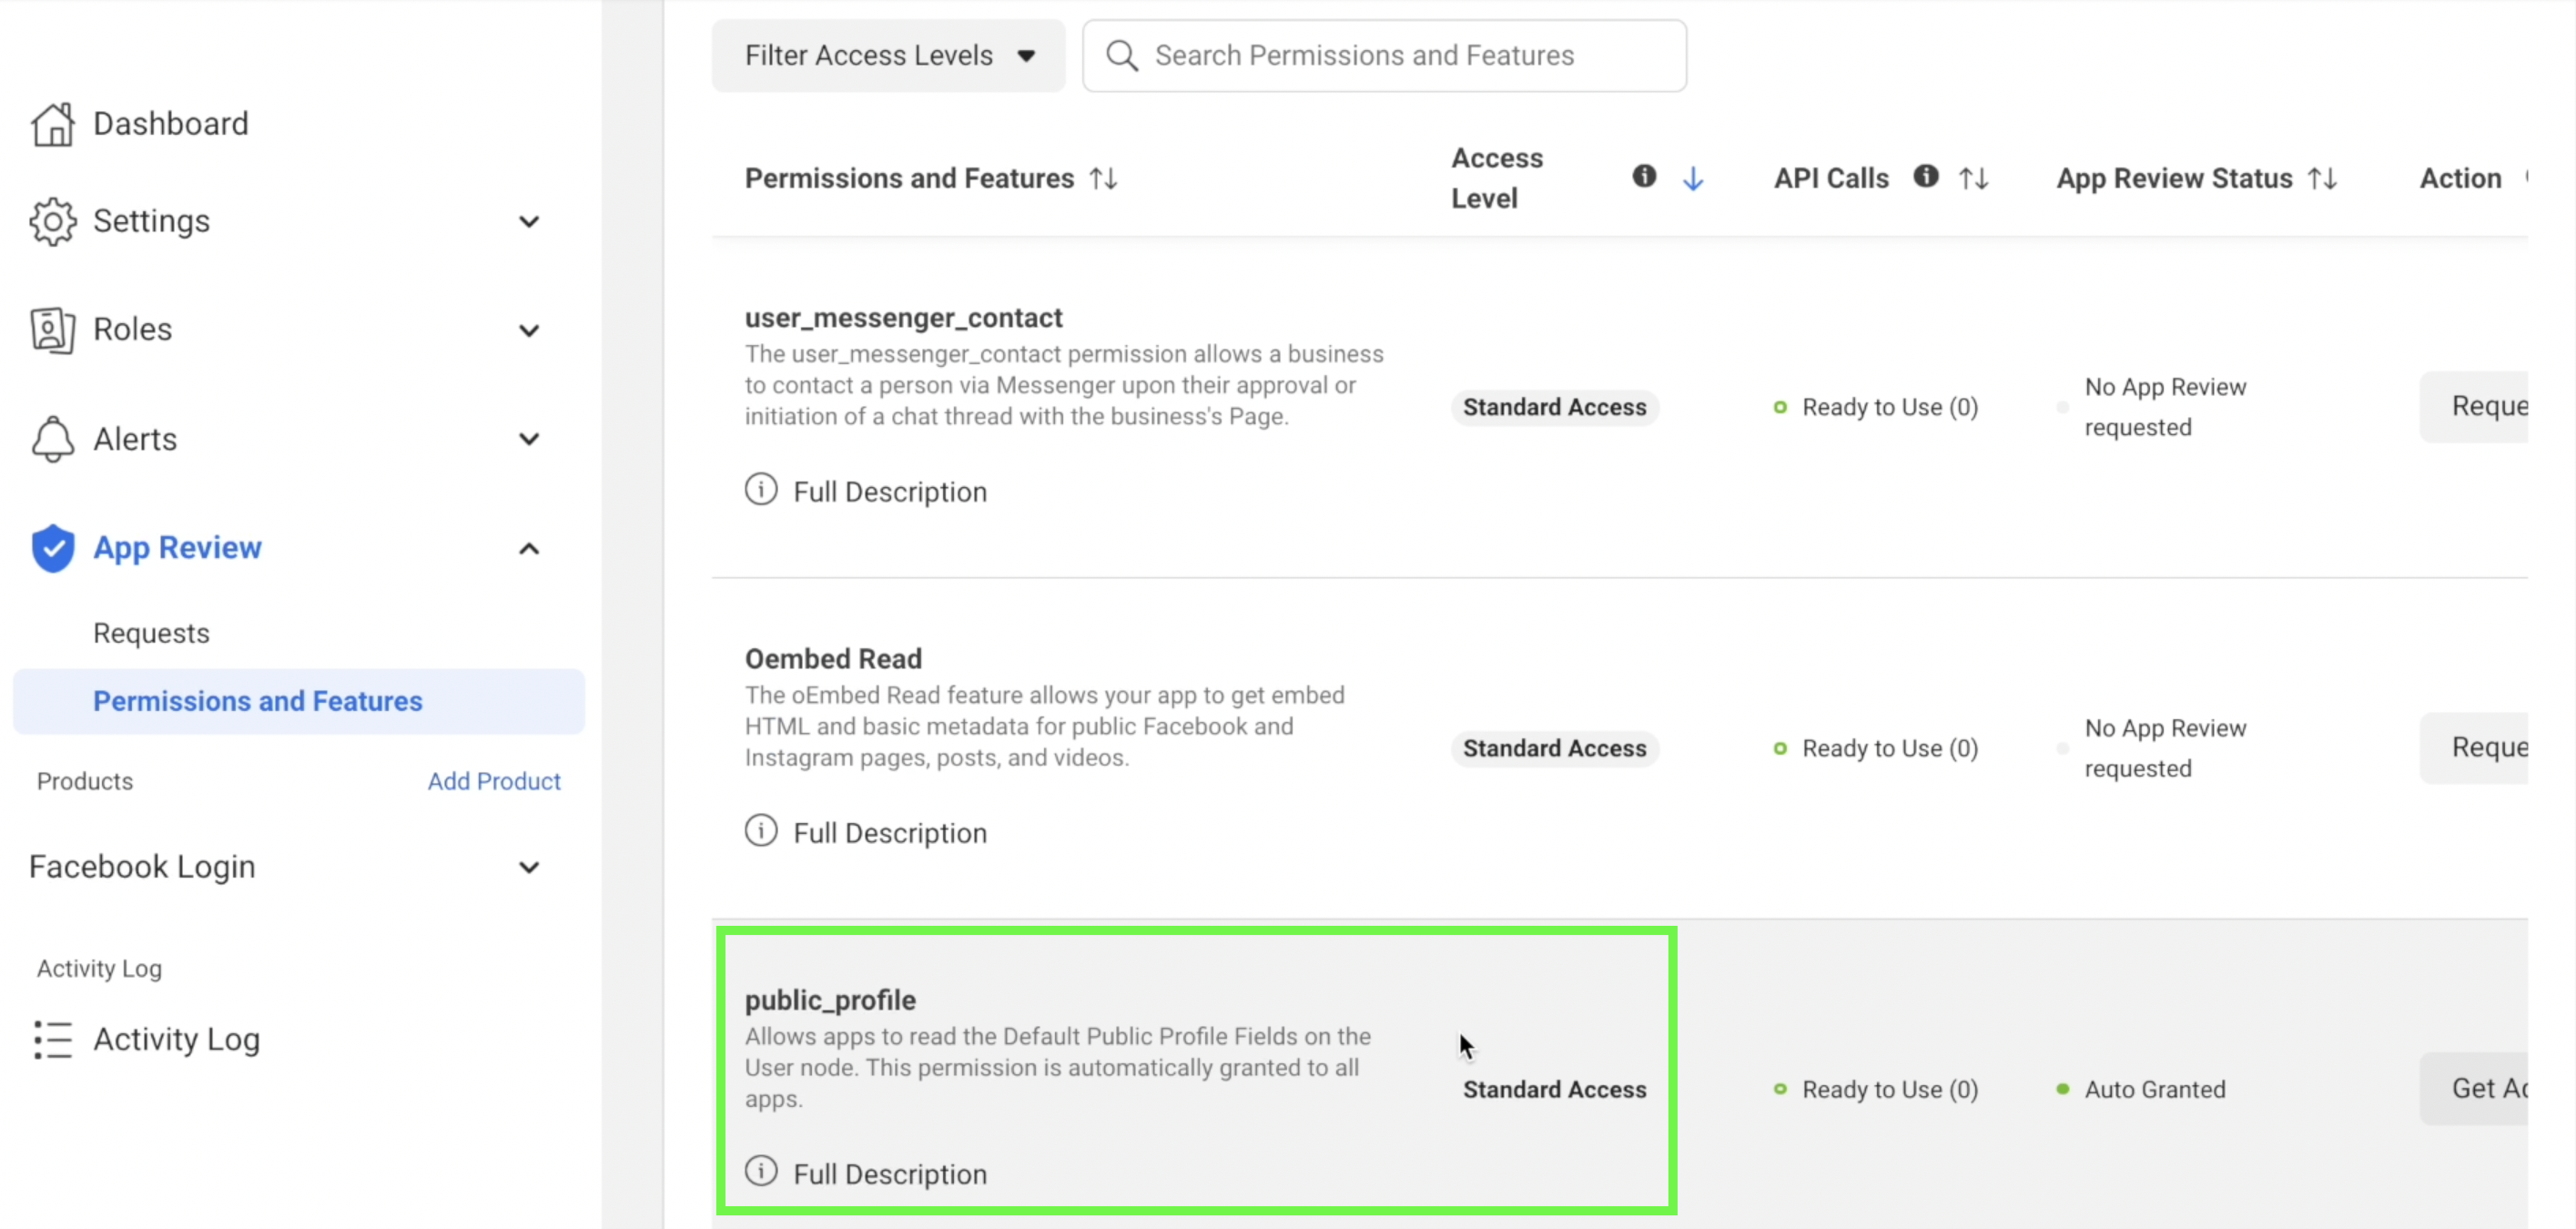
Find "public_profile" in the first column.
- (d) In public_profile row, navigate to the last column on the right and click "Get Advanced Access". A modal will pop up, proceed to the next step.
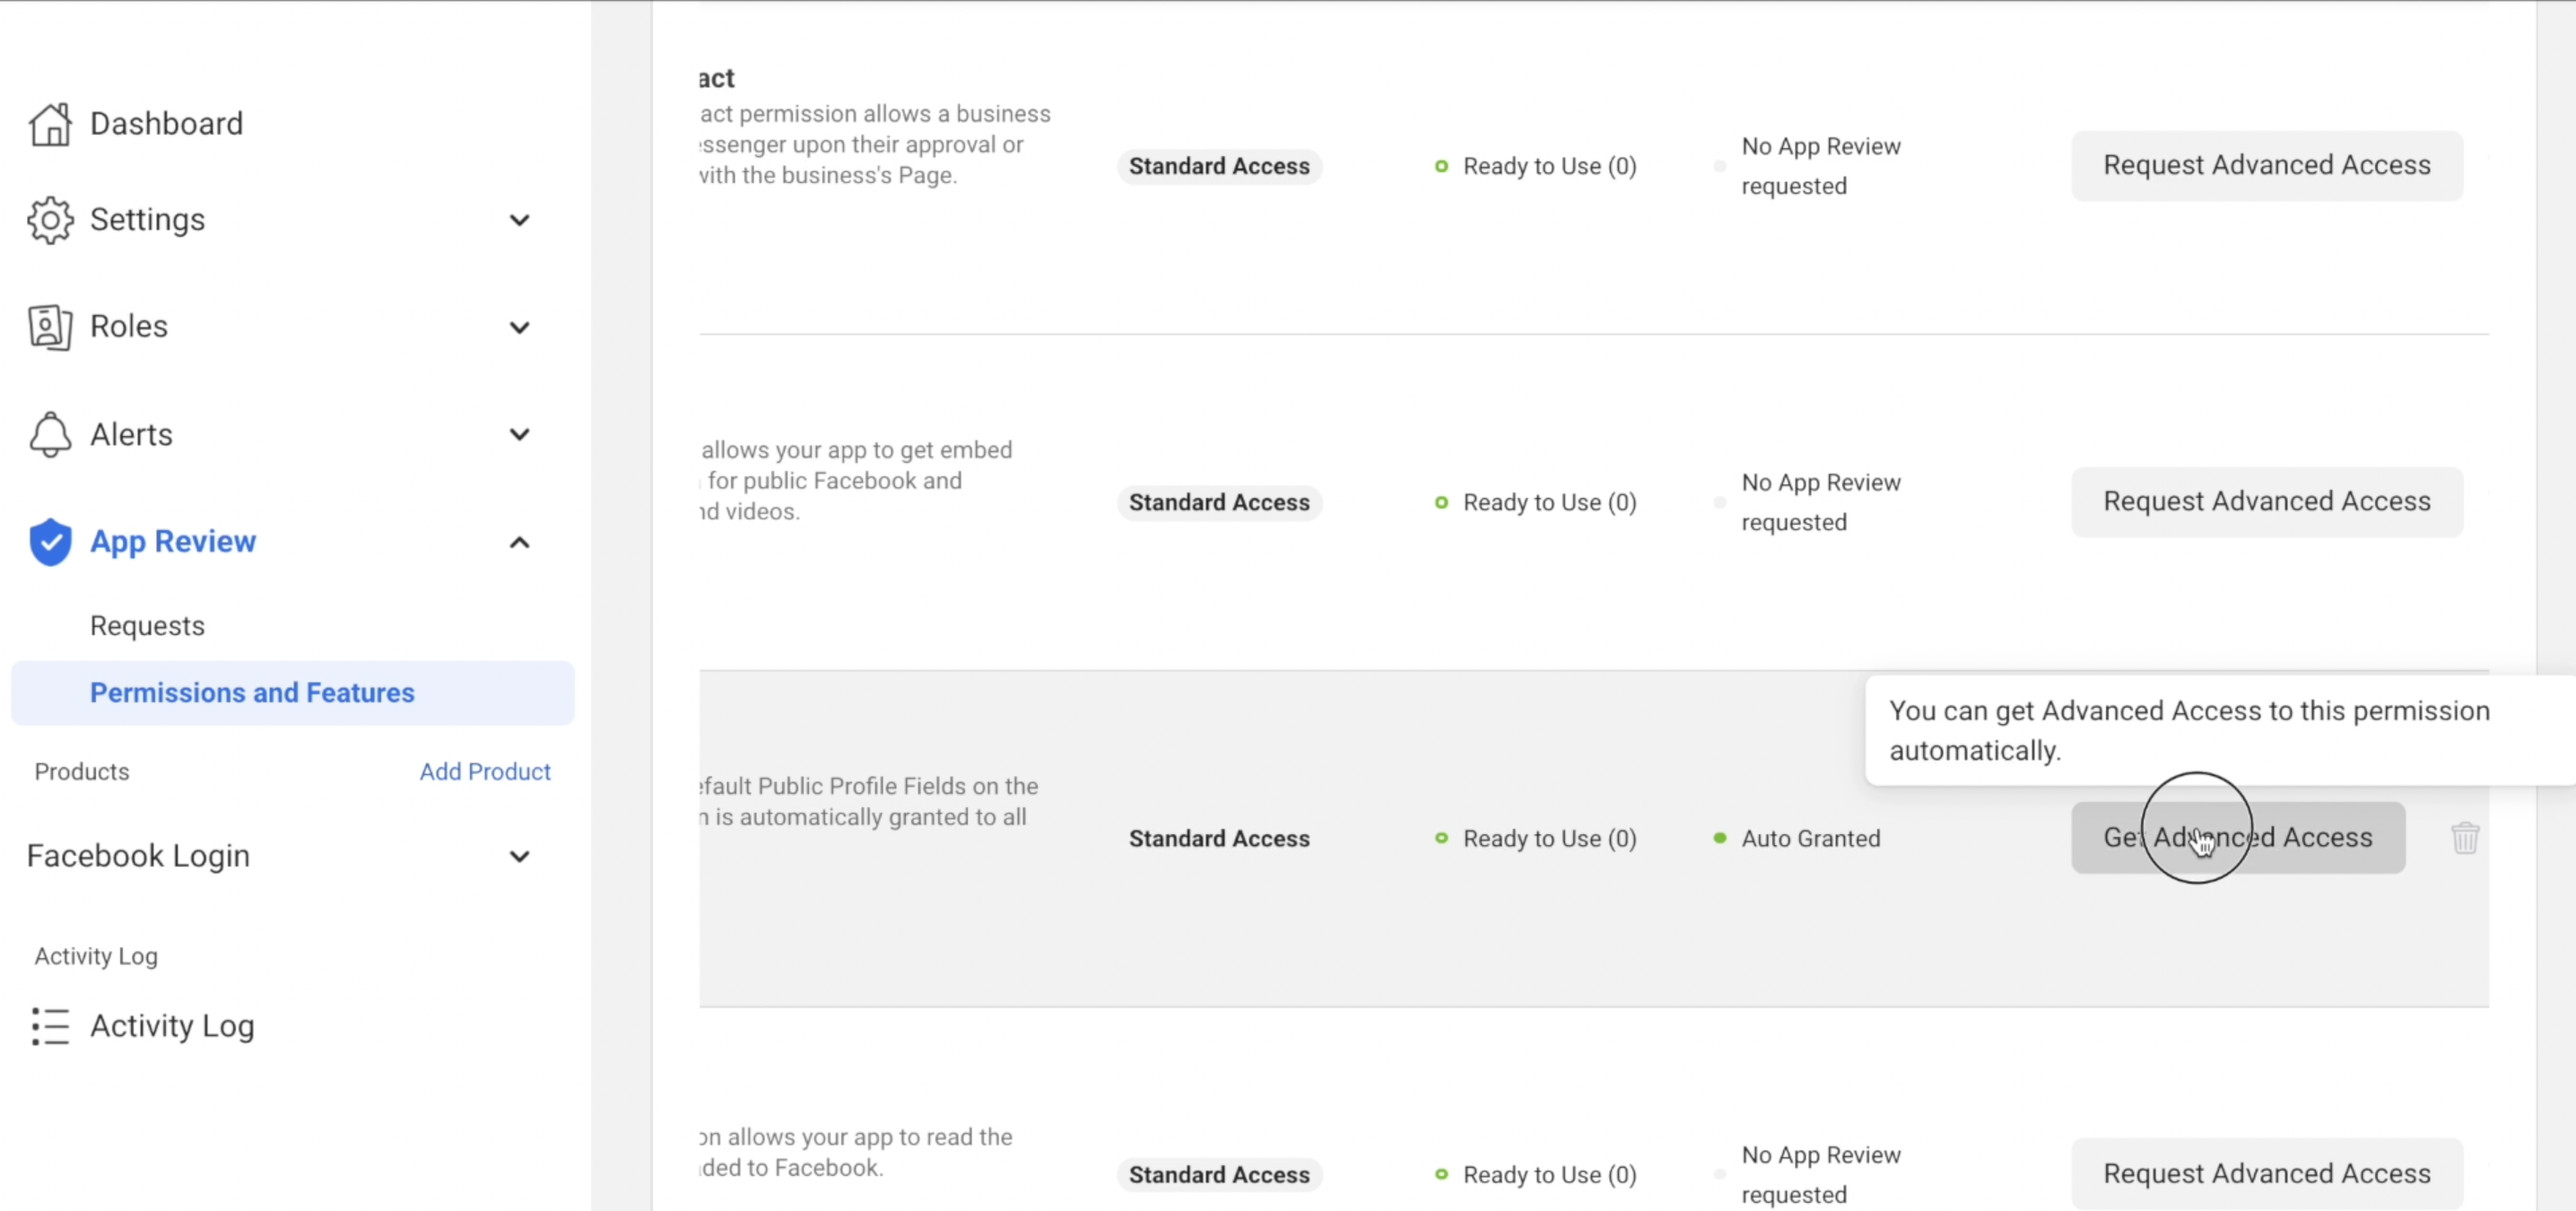
Navigate to the last column and click "Get Advanced Access".
- (e) Review the text displayed in the modal. If you agree, then tick the box and click "Confirm".
(ii) Configure Valid OAuth Redirect URIs and Allowed Domains for JavaScript SDK.
Navigate to the left nav bar and select "Facebook Login" and then "Settings".
- (a) Set the values for the Valid OAuth Redirect URIs under Valid OAuth Redirect URIs similar to the example below.
- (b) Enable “Login with the JavaScript SDK” by sliding the bar to "Yes" and then Save.
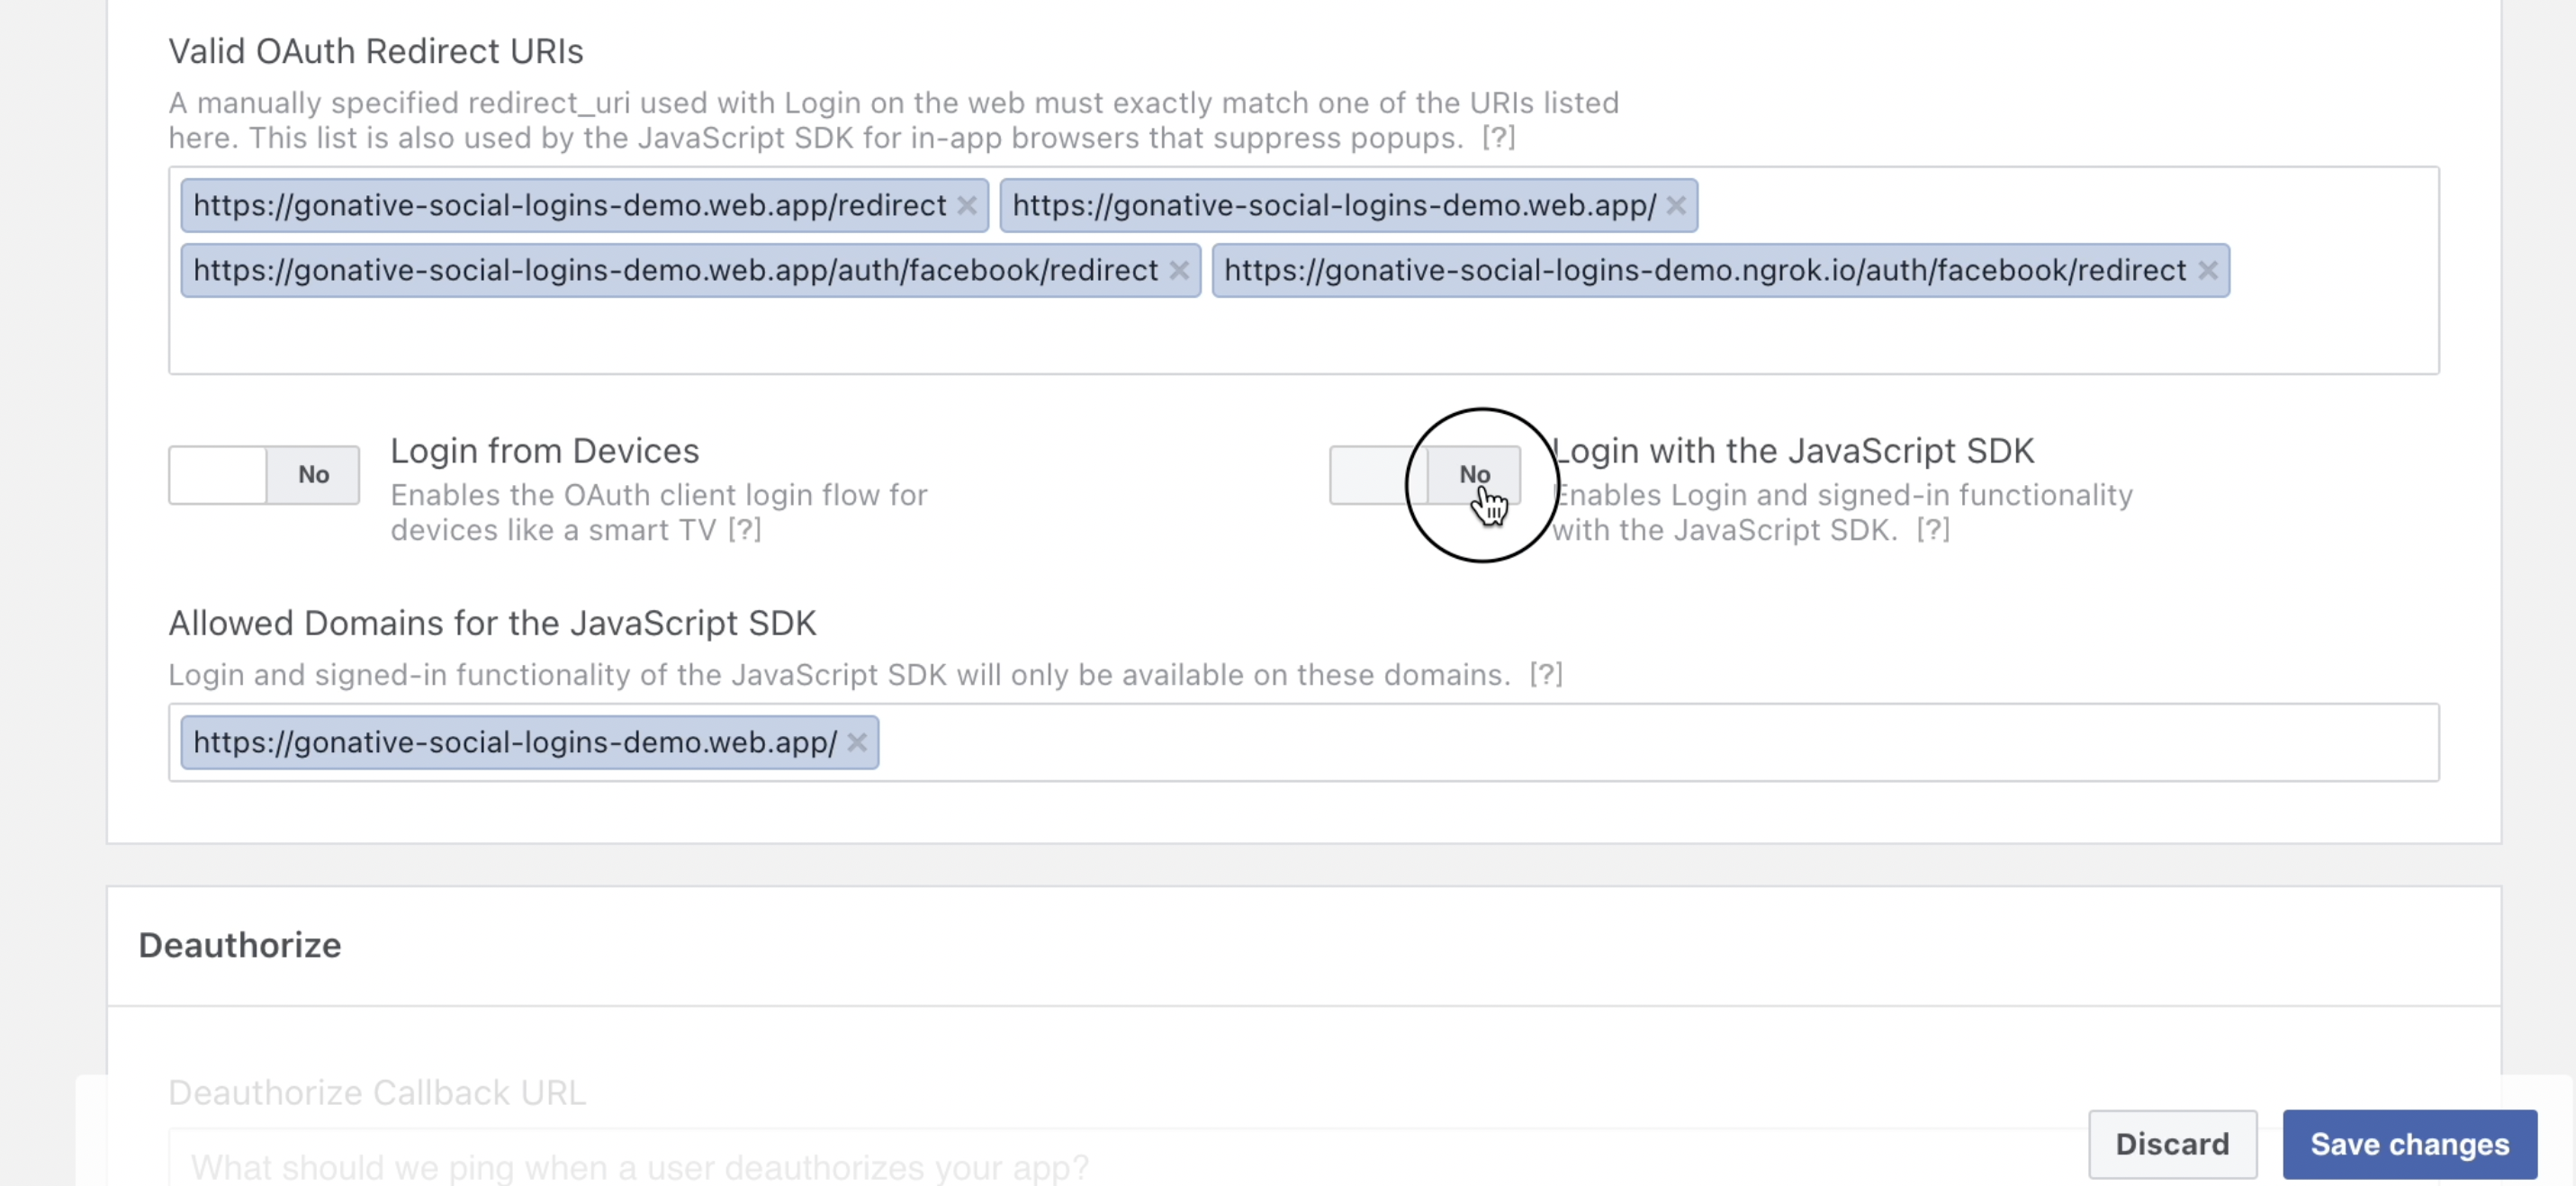
Enter Valid OAuth Redirect URIs and Enable “Login with the JavaScript SDK"
Step A4. Obtain Client Token
Next, navigate to the left nav bar and expand "Settings" and then "Advanced". Next, scroll down to find the client token, which can be seen in the green box below. Record this token.
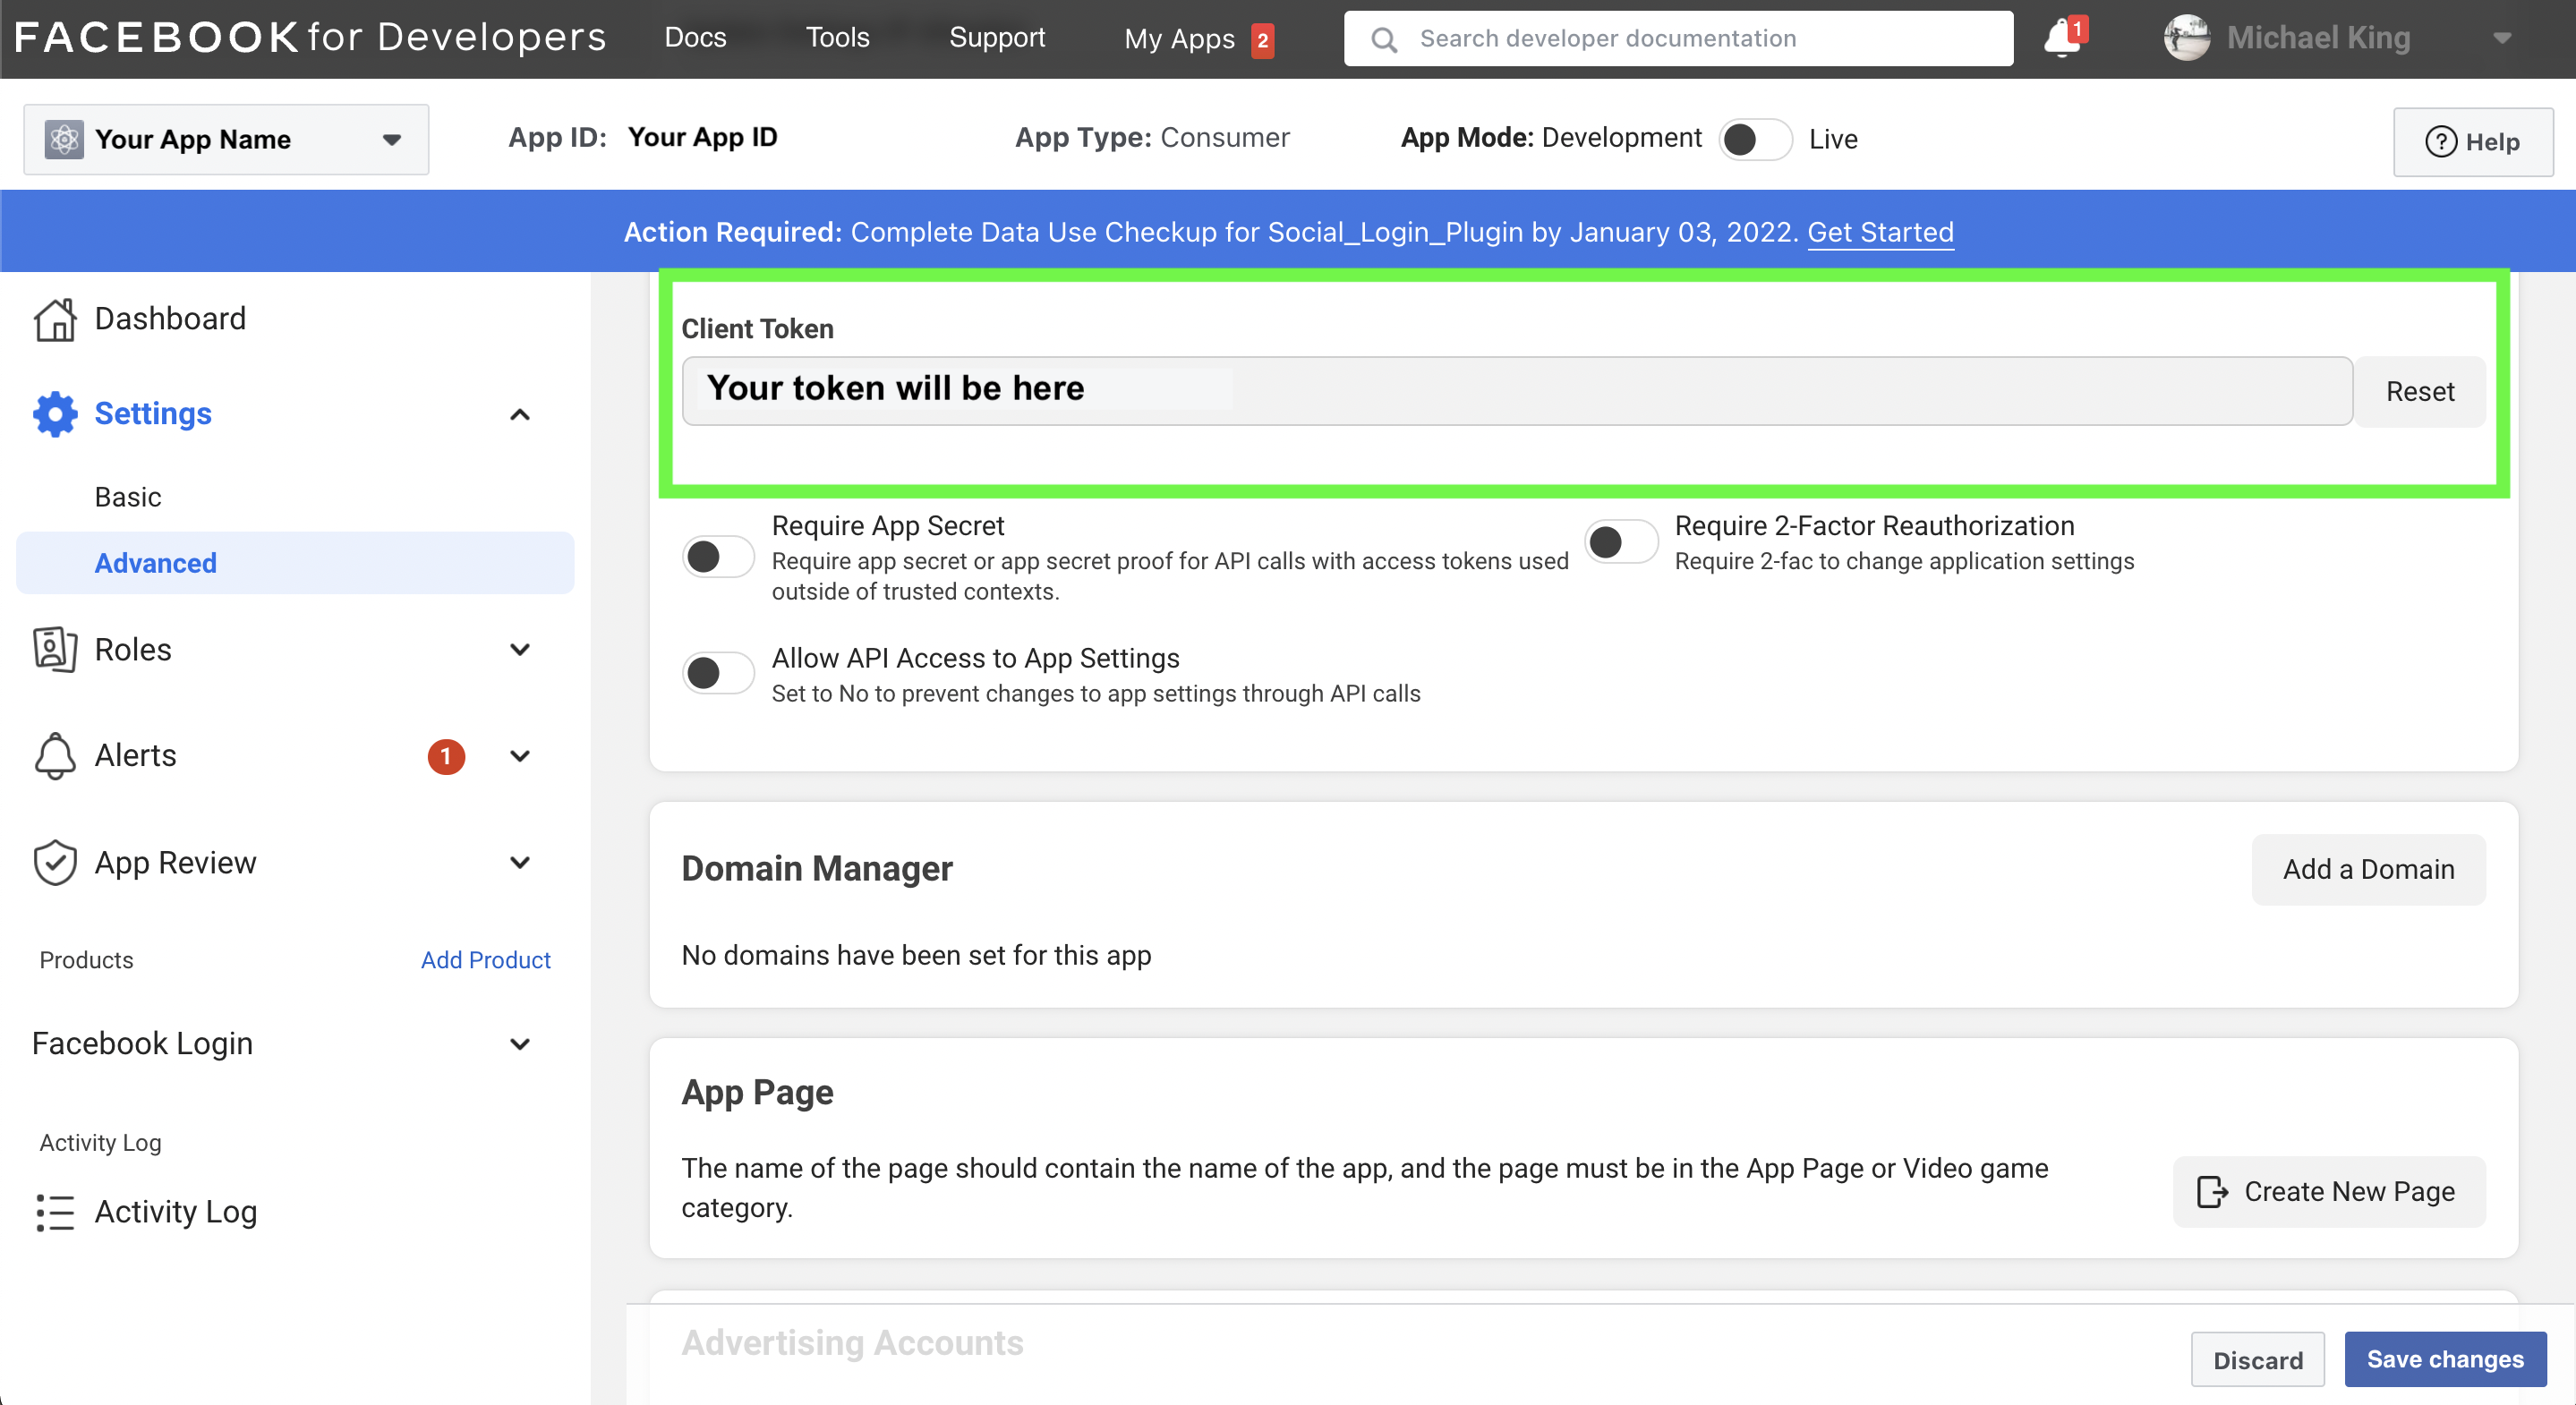
In the nav bar, select "Settings" and then "Advanced". Next, find the client token and keep this so that you can provide to the Median's technical team.
Step A5. Request App Review
(i) Save changes and navigate to the left nav bar. Select the "App Review".
(ii) Select "Permissions and Features" and then "Not Now".
(iii) A modal "How This App Requests Data" may appear on your screen during these steps, review and click "Not Now".
(iv) Finally you will now see the following. Review the points and click "Done".
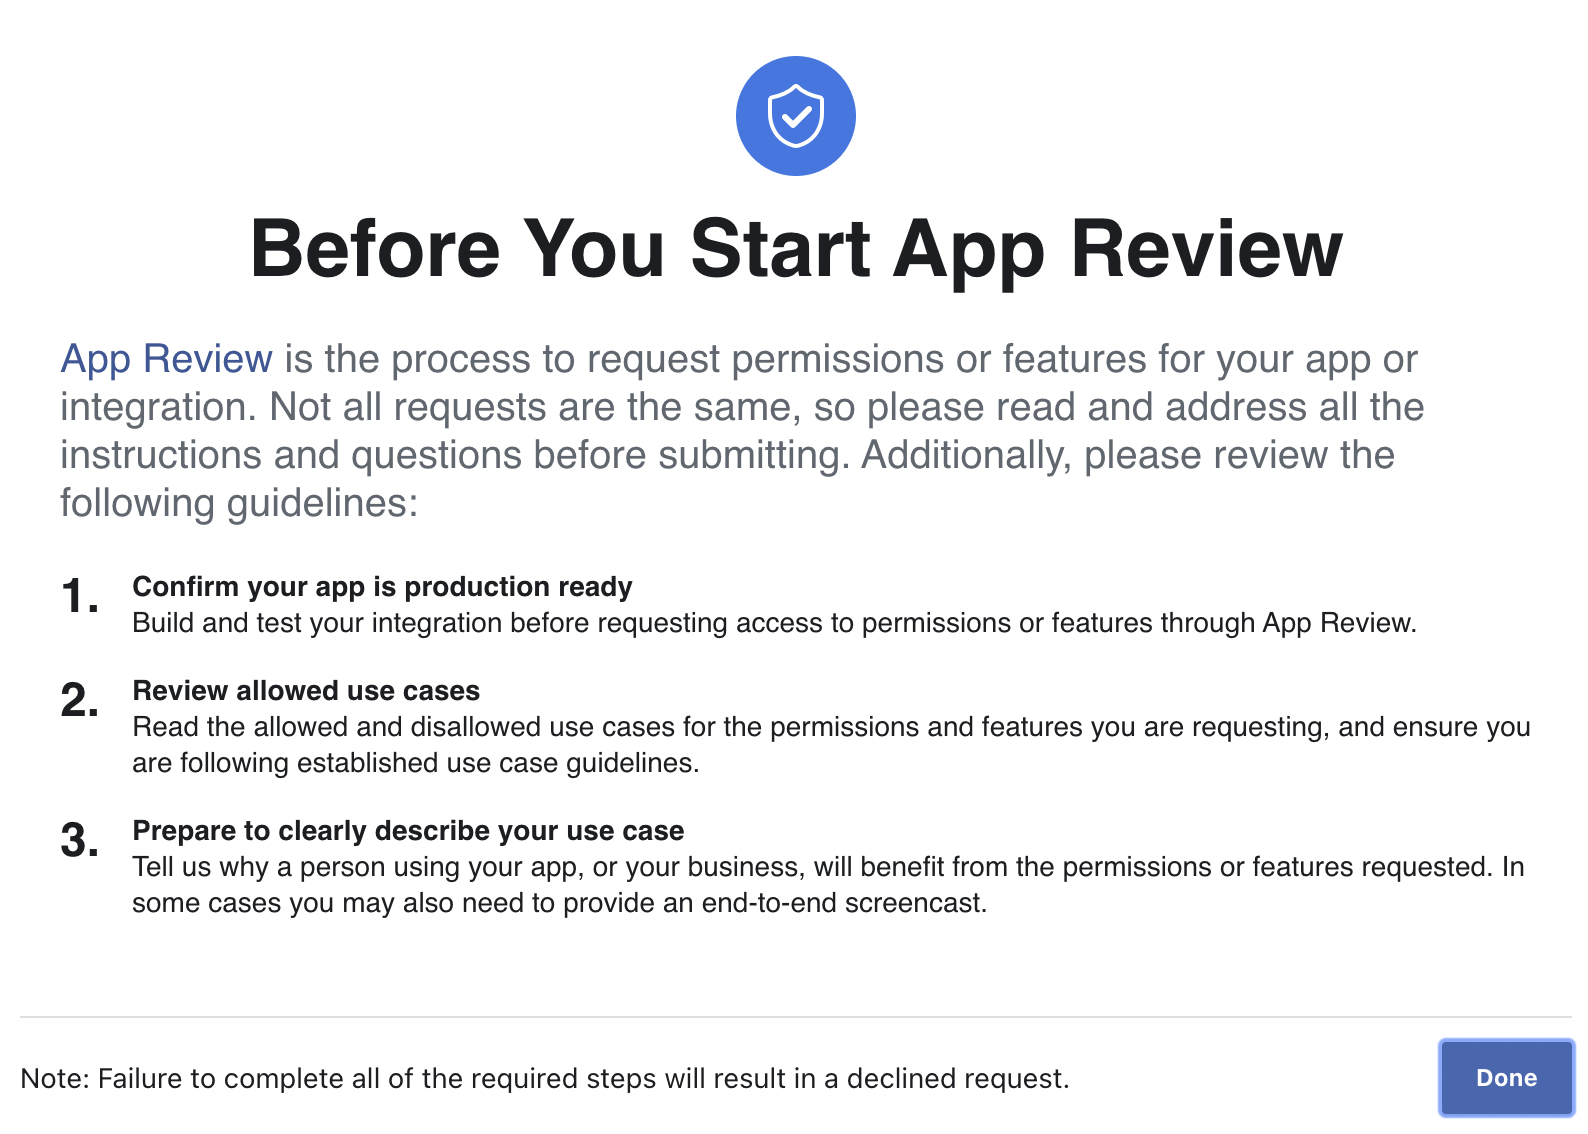
Review the points and click "Done".
Facebook App Complete!
Congratulations! You have created a Facebook App and configured its settings. Next, configure this app for both iOS and Android. At this point you should have the following information.
- App Id and Display Name (found in Step 2 above)
- Client Token (iOS Only, found in Step 5 above)
B. iOS Configuration
The following steps assume that you have created a Facebook app and configured its settings. If you have not done this then see the above section at the top of this page.
Step B1. Add iOS Platform
- (i) Navigate to the left nav bar and expand "Settings" then "Basic".
- (ii) Scroll to the bottom of the page.
- (iii) Click “Add New Platform”. See green box in image below.
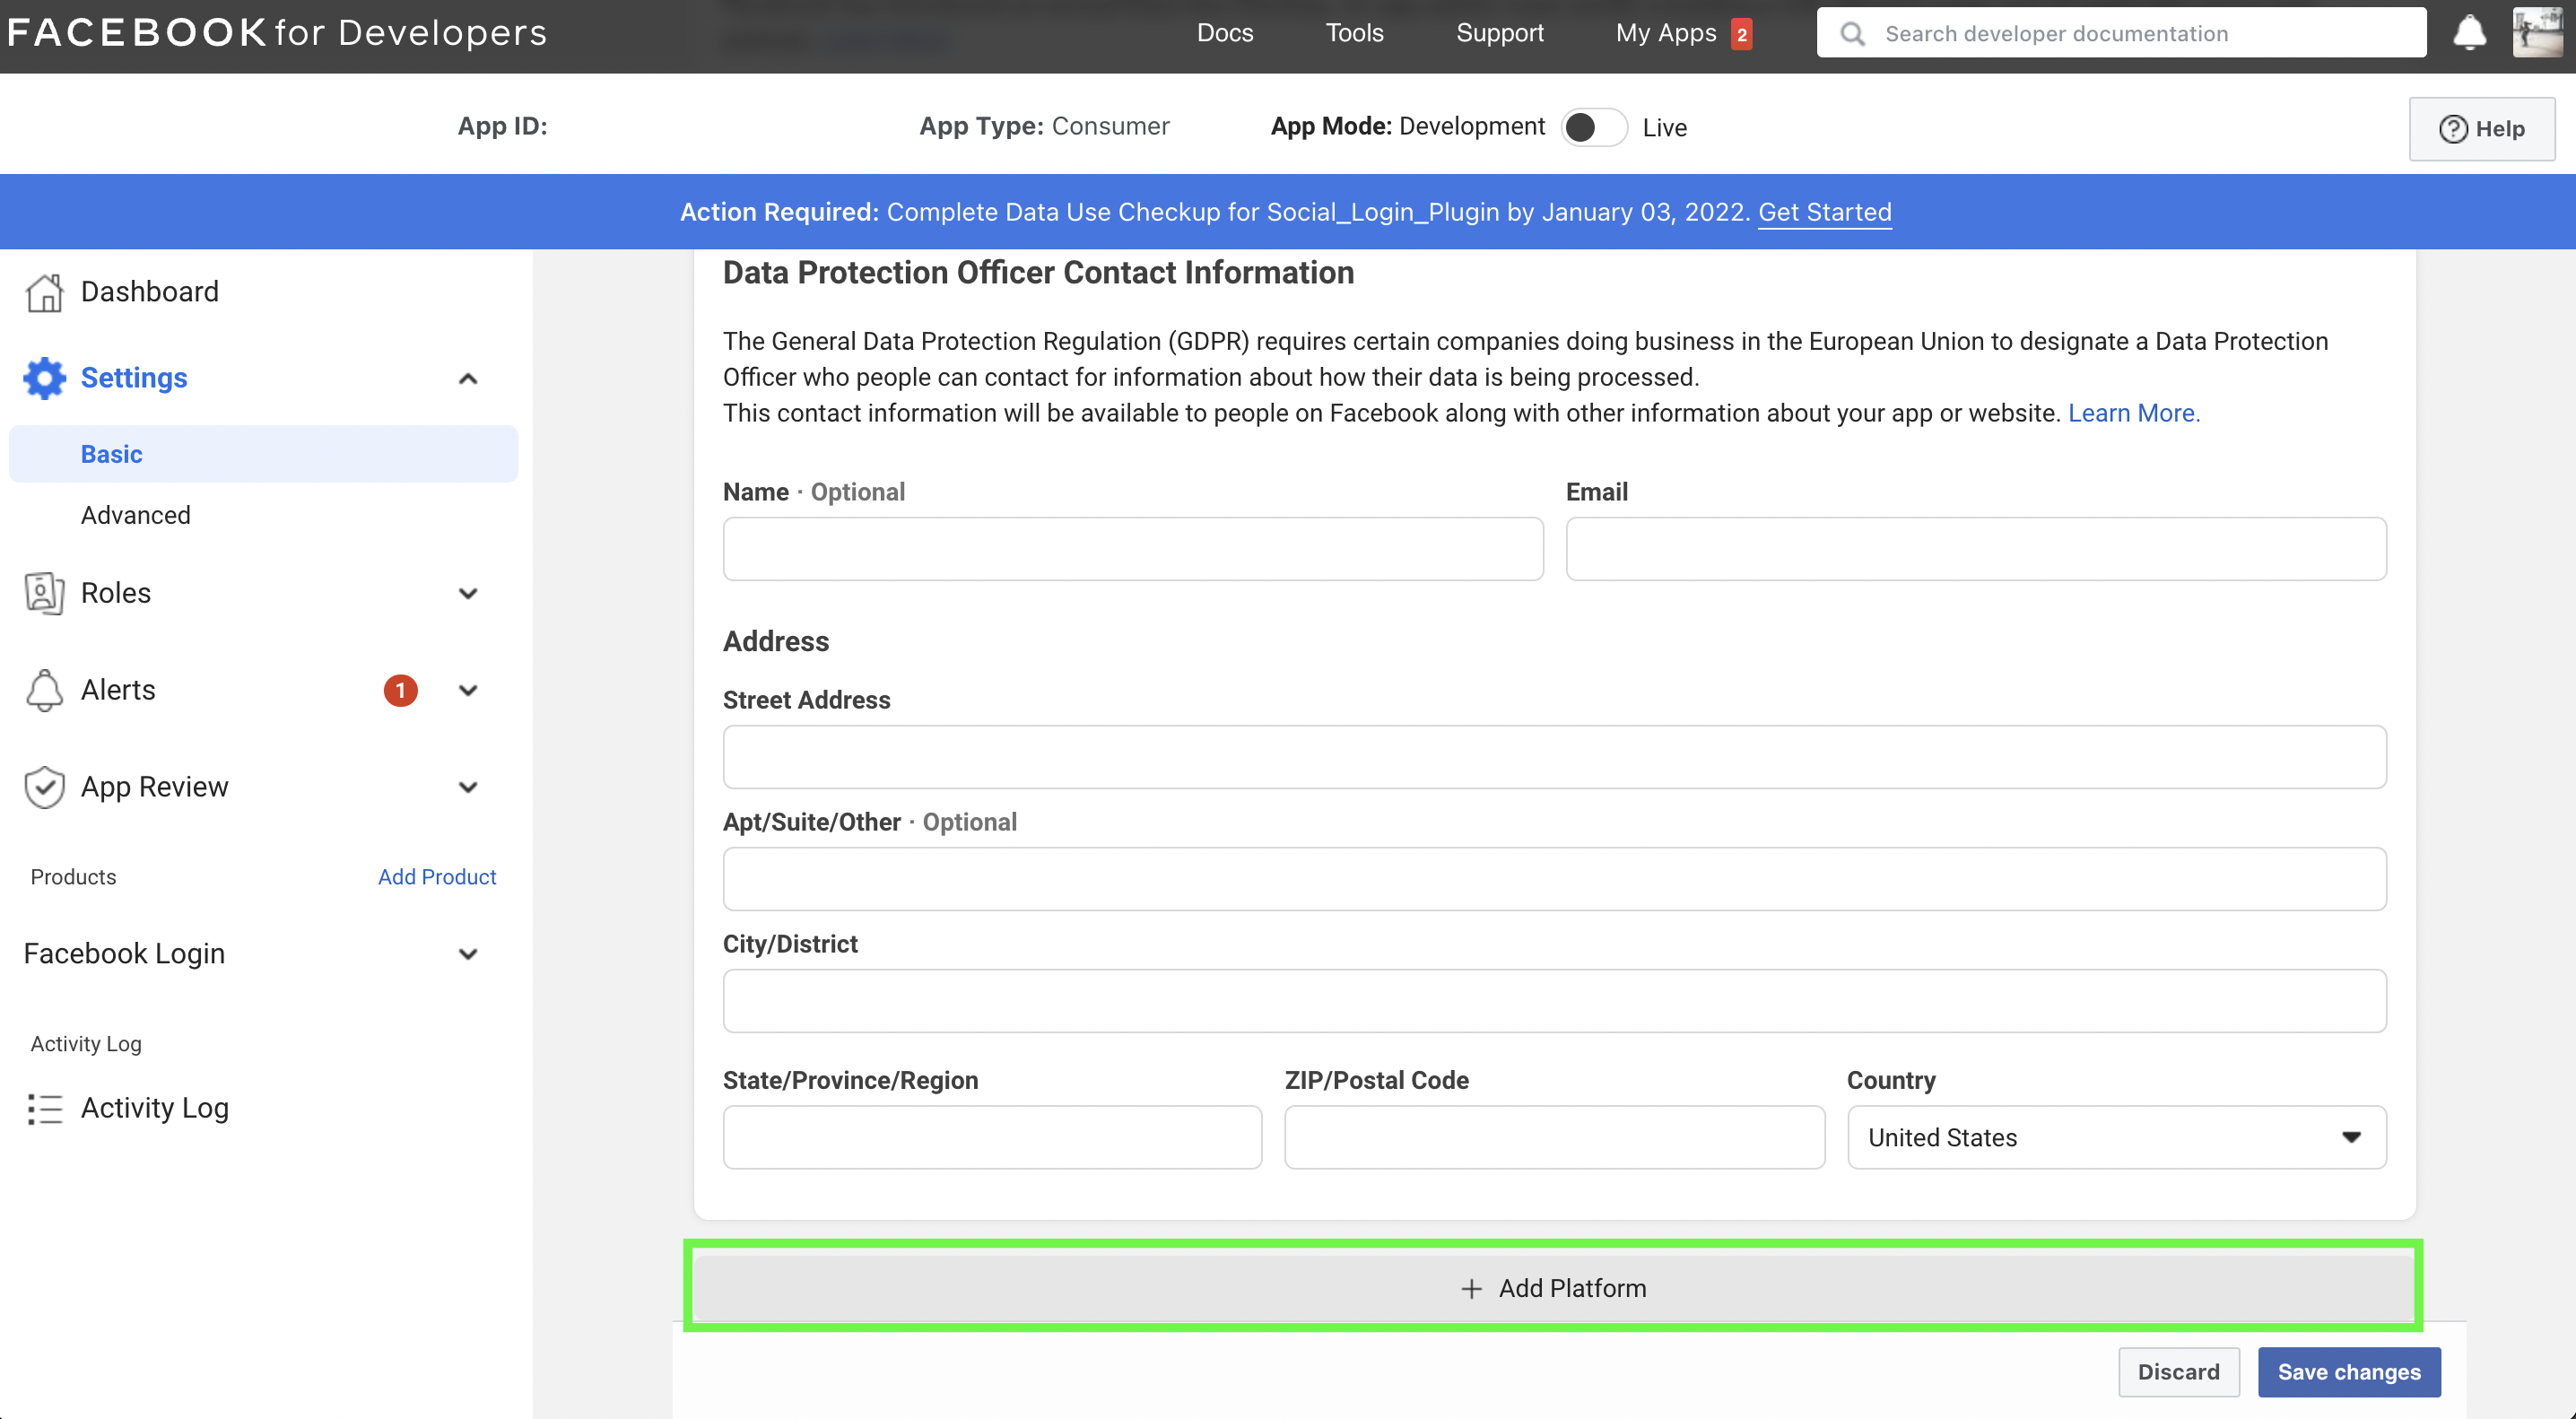
Click “Add New Platform”.
- (iv) Select Website and iOS. Click "Next".
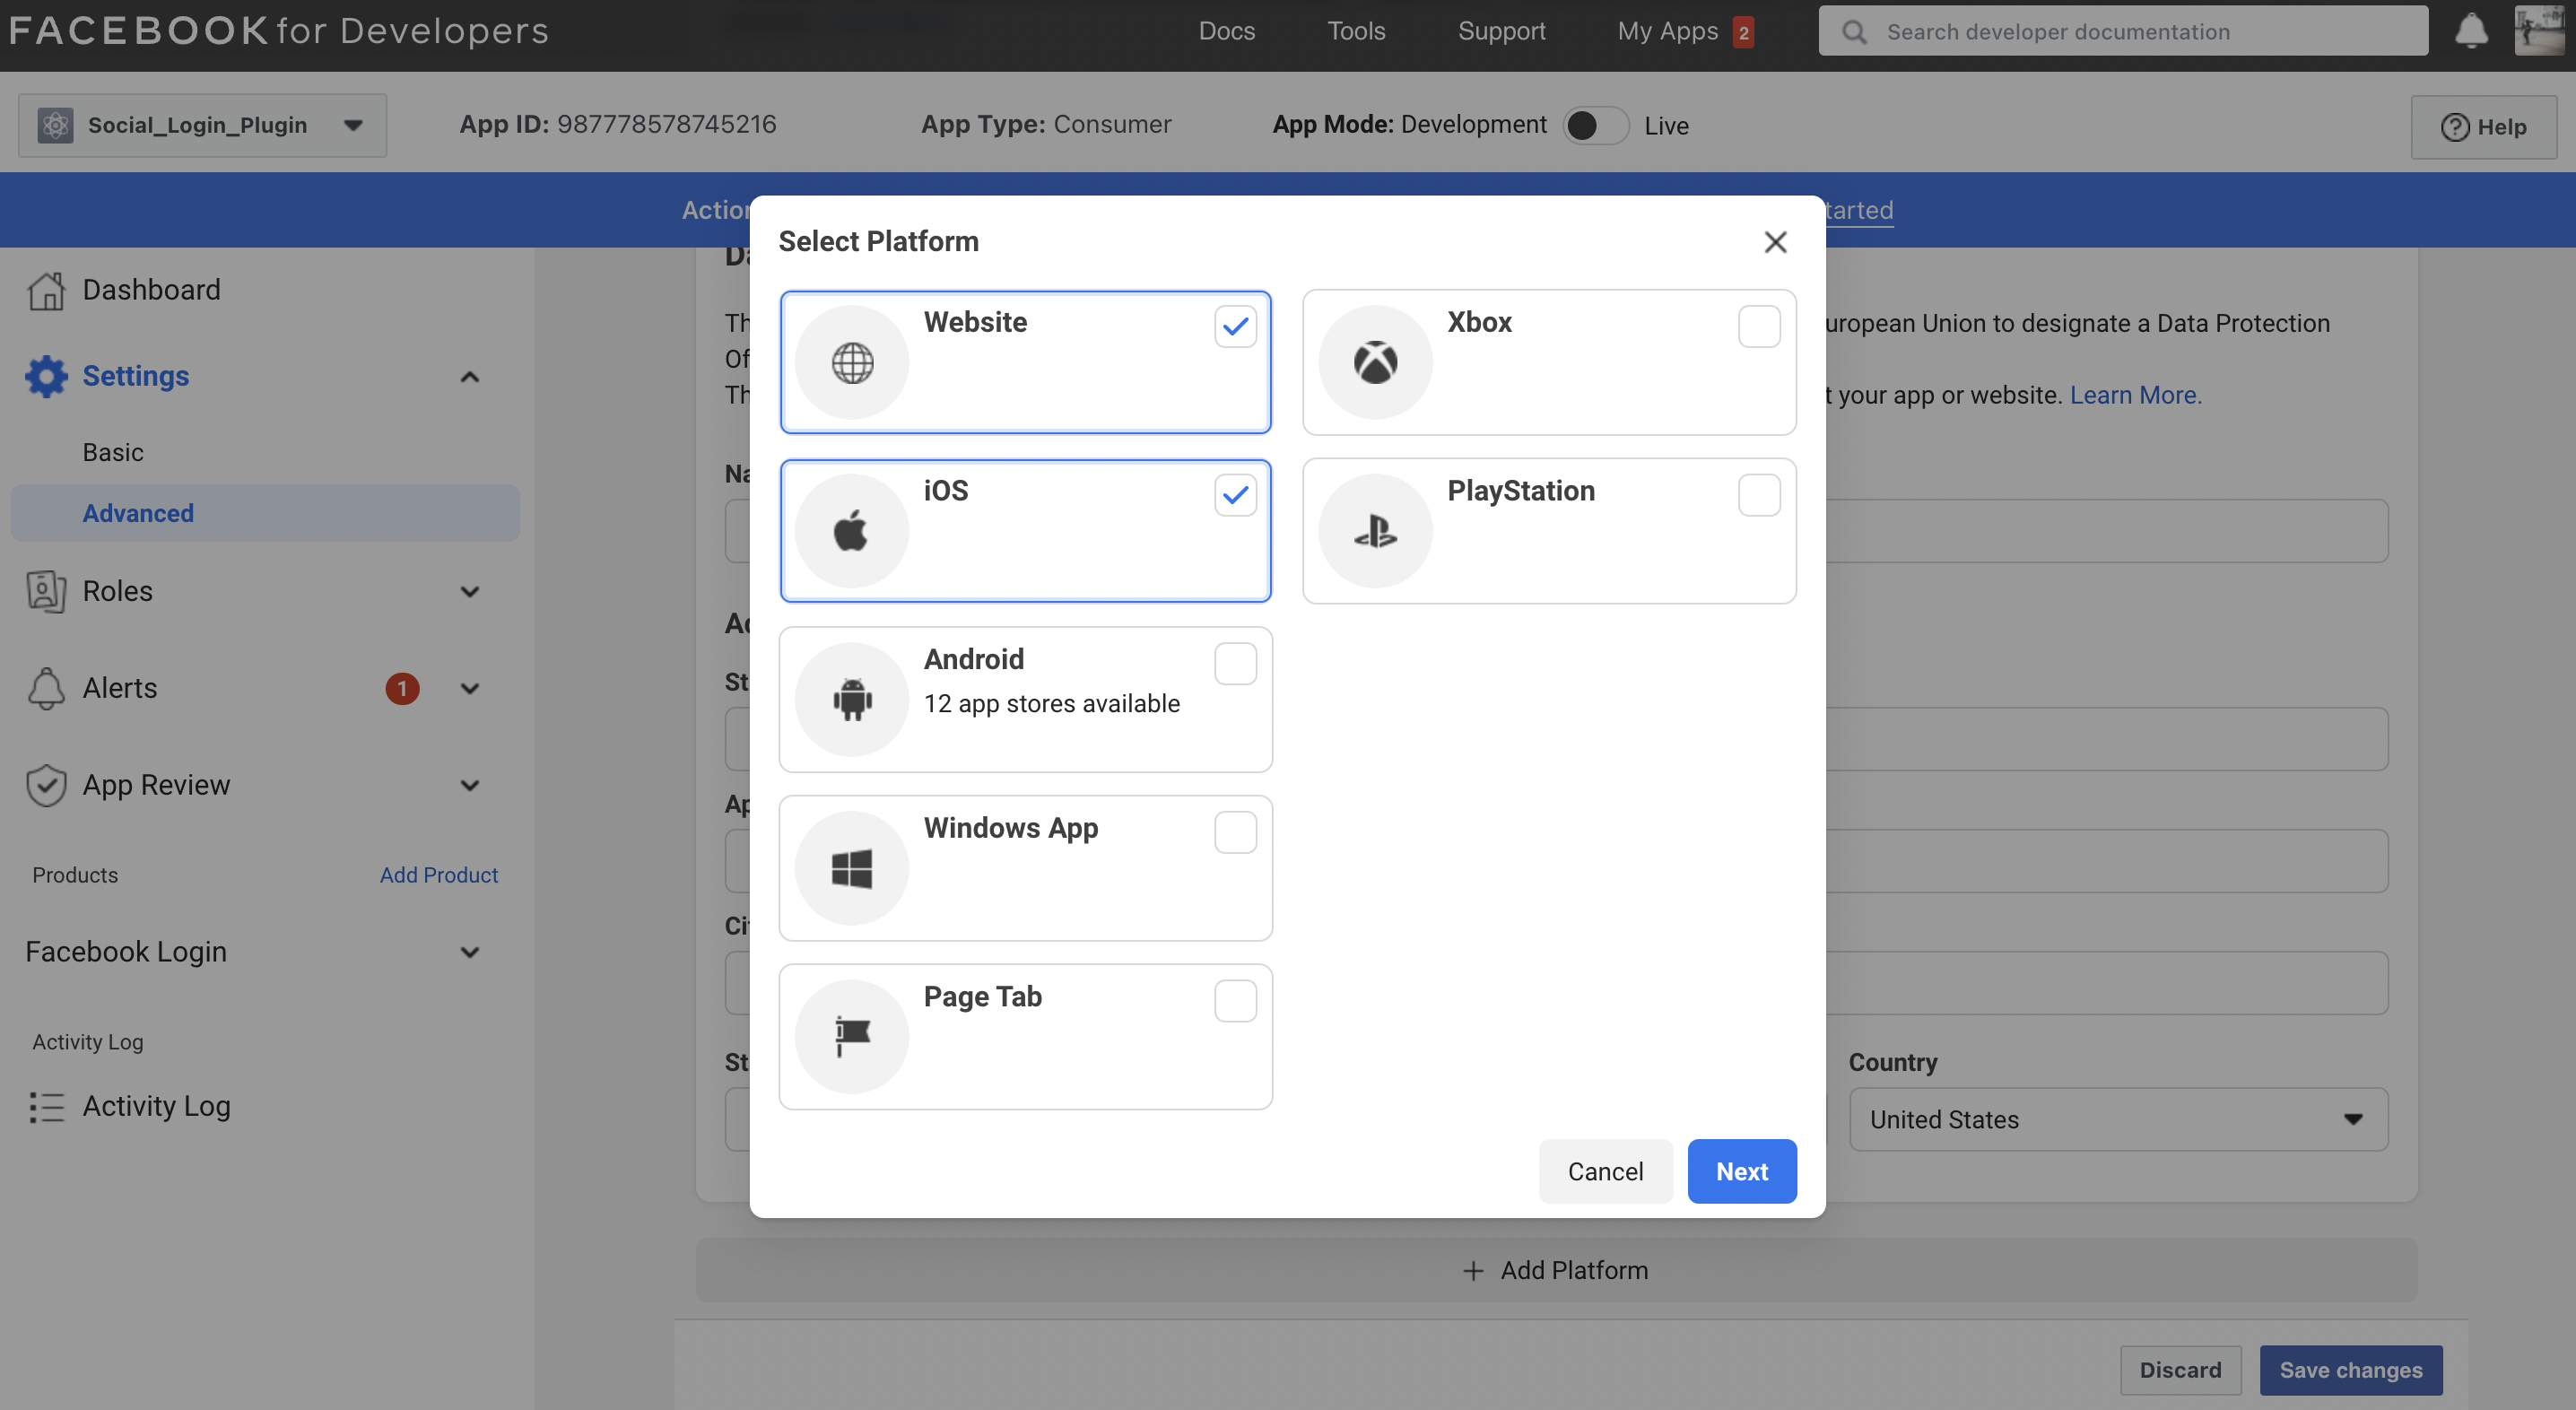
Select Website and iOS. Click "Next".
Step B2. Adding Site URL and Bundle ID.
Your site URL and Bundle ID should be entered in the fields annotated below in the green boxes. Add the bundle ID for your app along with any development or test version bundle IDs if applicable.
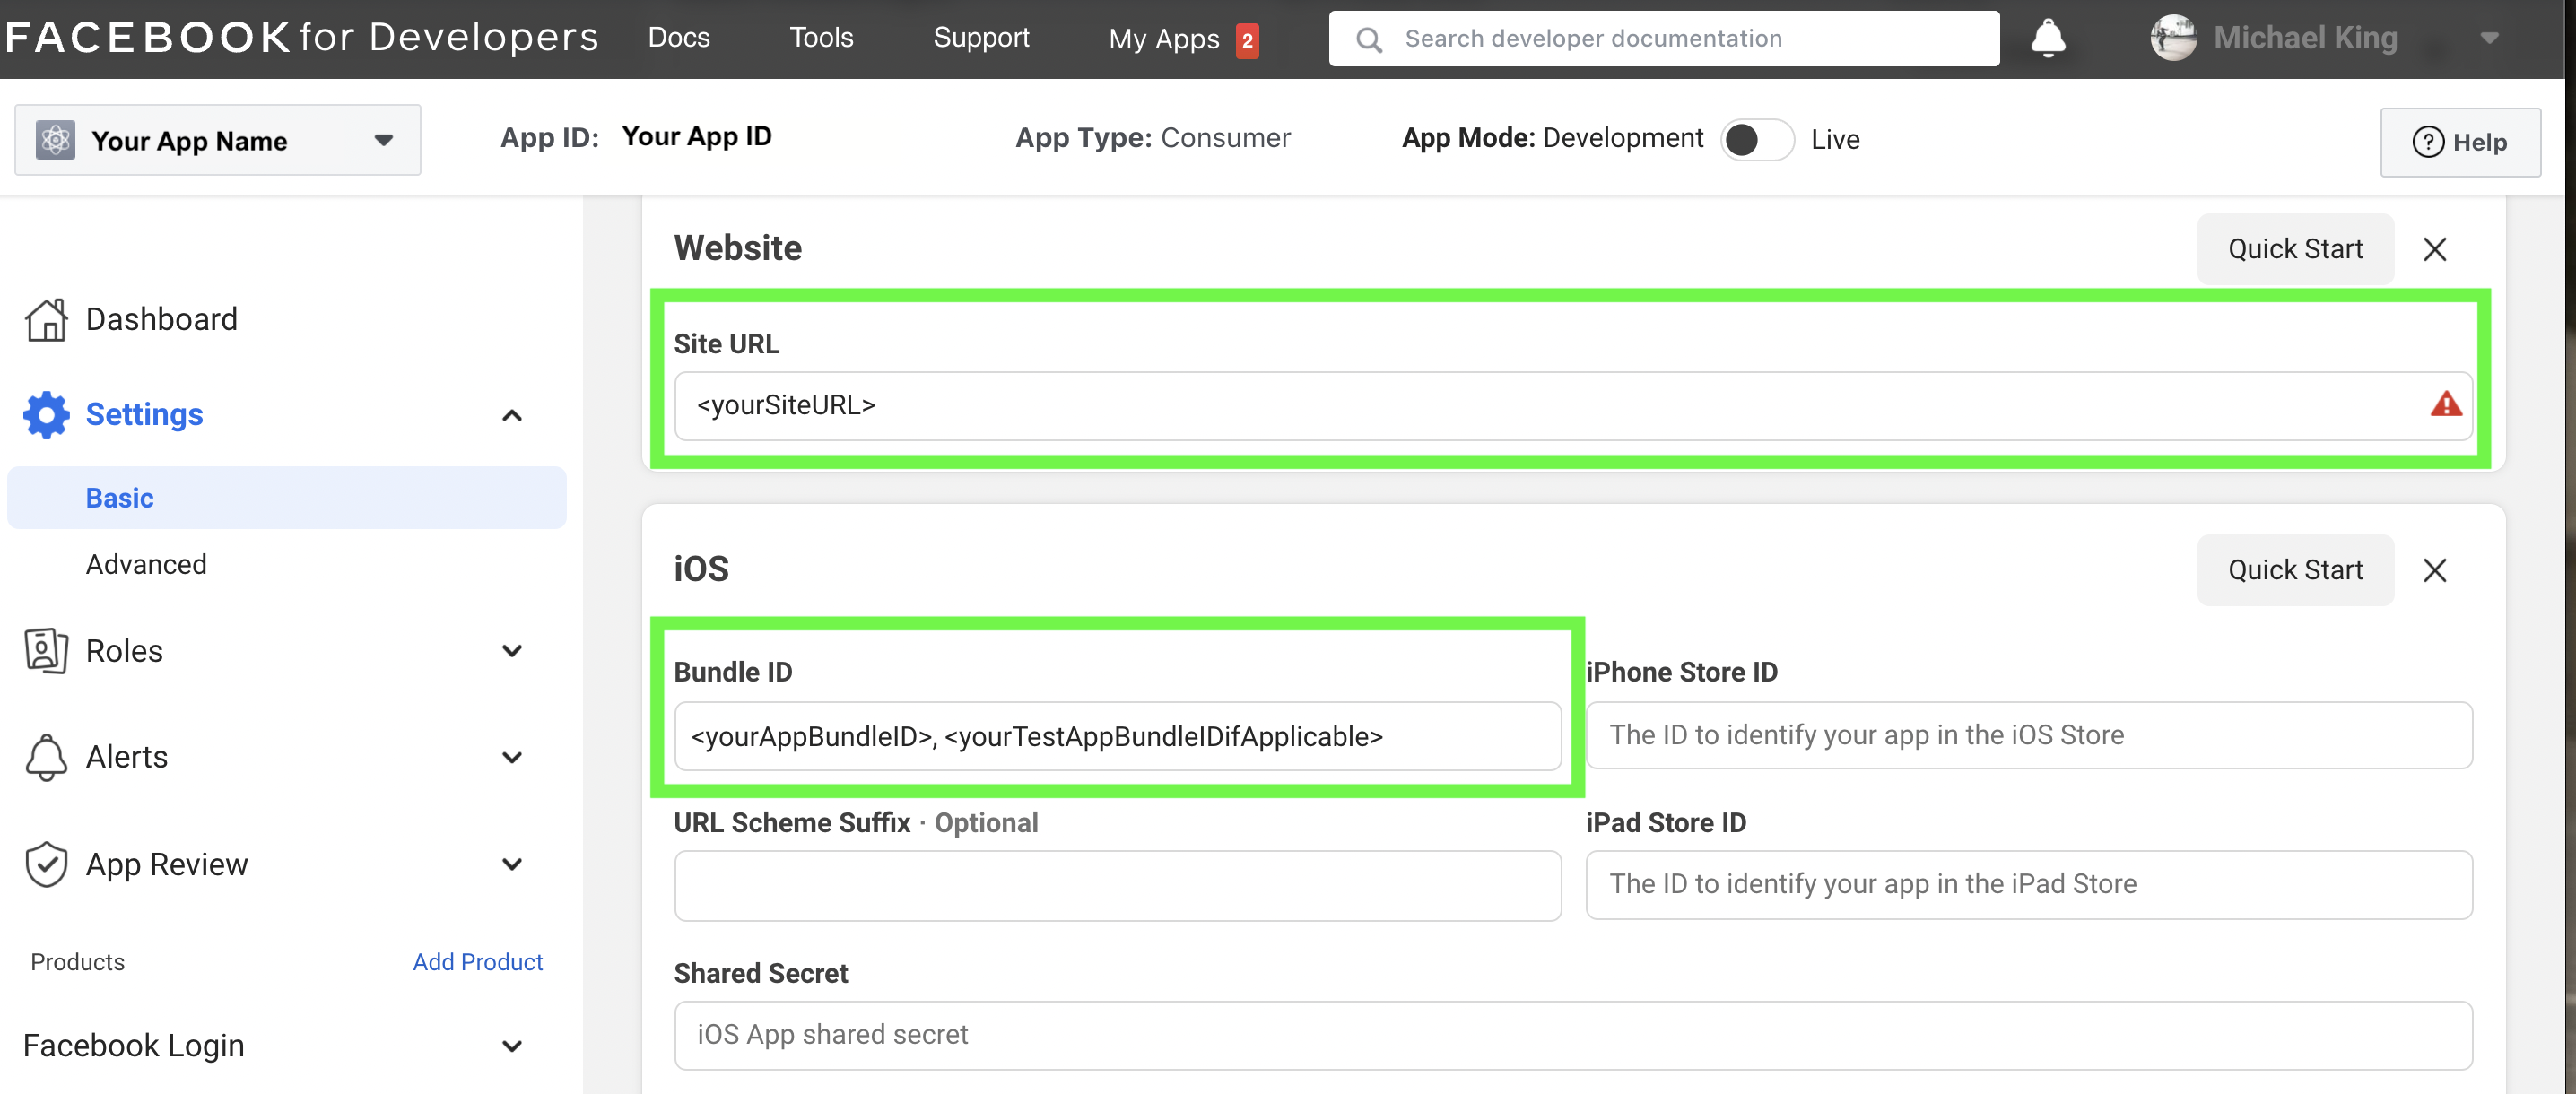
Enter your Site URL and Bundle ID.
iOS Facebook Login configuration complete!
Congratulations! You've completed configuring Facebook Login for iOS. After testing, remember to log back into your Facebook Developer Account and set your app to live mode. Click "My Apps" and set App Mode to Live.
C. Android Configuration
The following steps assume that you have created a Facebook app and configured its settings. If you have not done this then see the above section at the top of this page.
The following steps assume that you have created a Facebook app and configured its settings. If you have not done this then see the above section at the top of this page.
Step C1. Add Android Platform
- (i) Navigate to the left nav bar and expand "Settings" then click "Basic".
- (ii) Scroll to the bottom of the page.
- (iii) Click “Add New Platform”. See green box in image below.
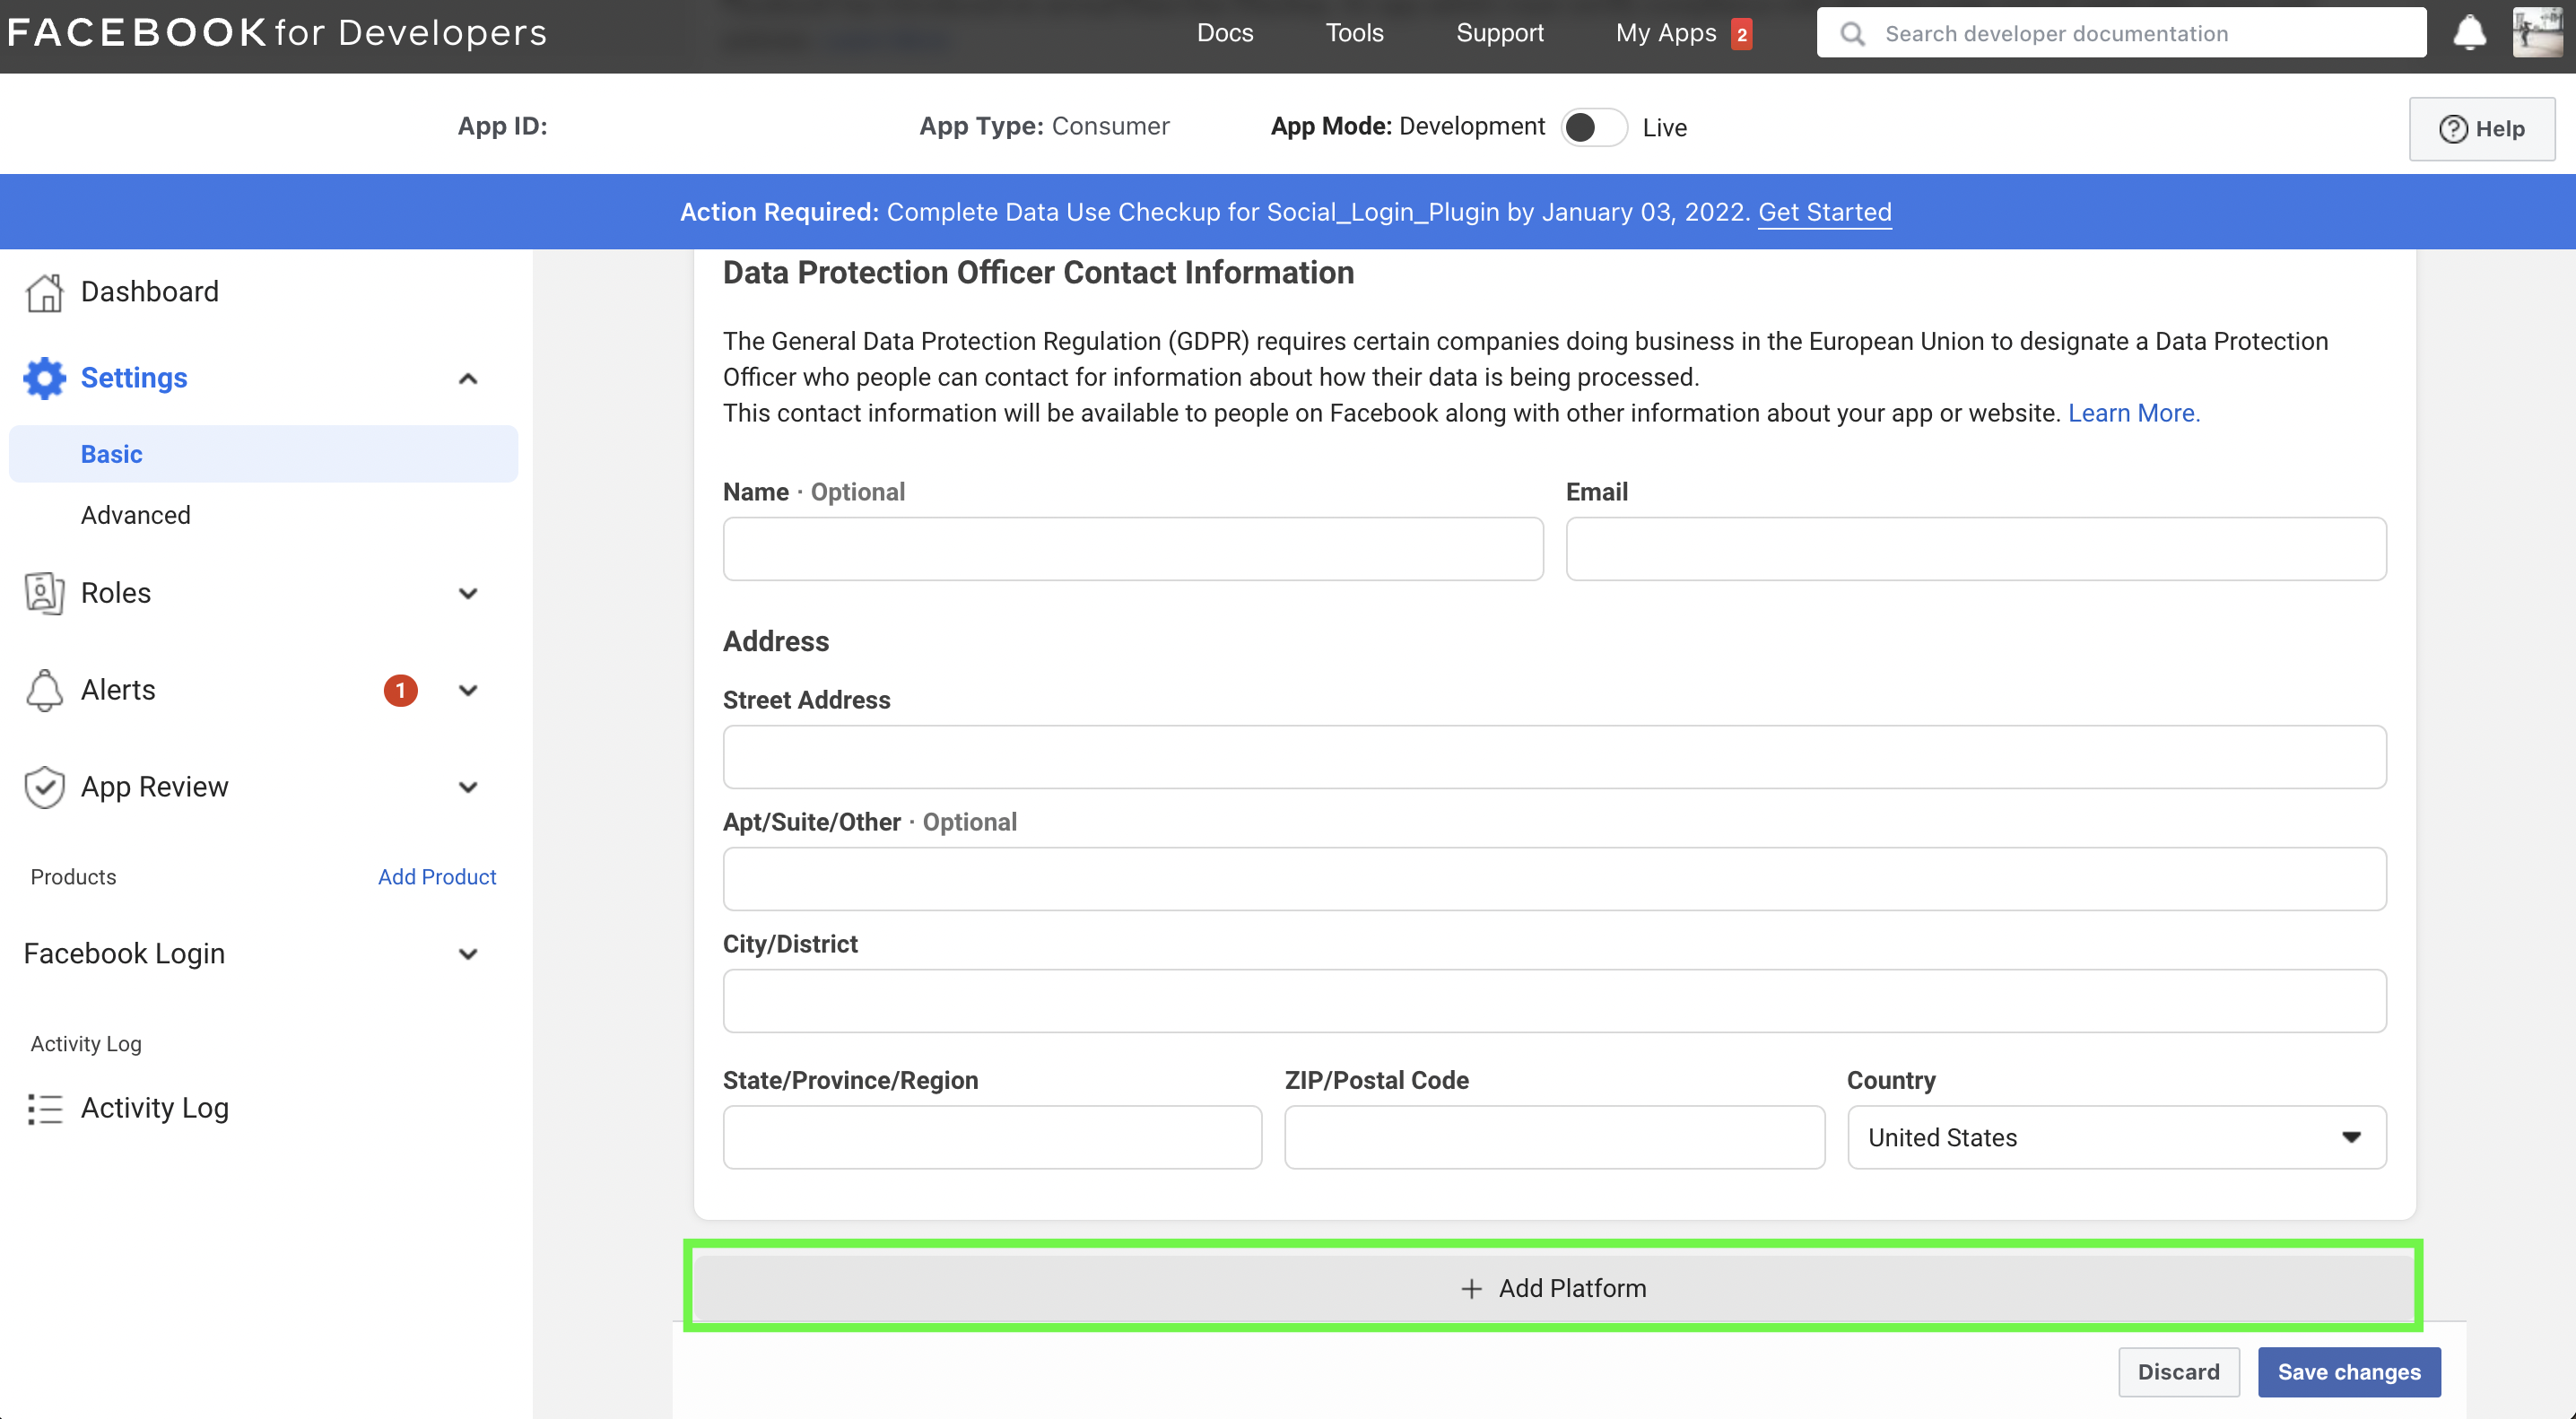
Click “Add New Platform” annotated with a green box.
(iv) Select Android and click "Next".
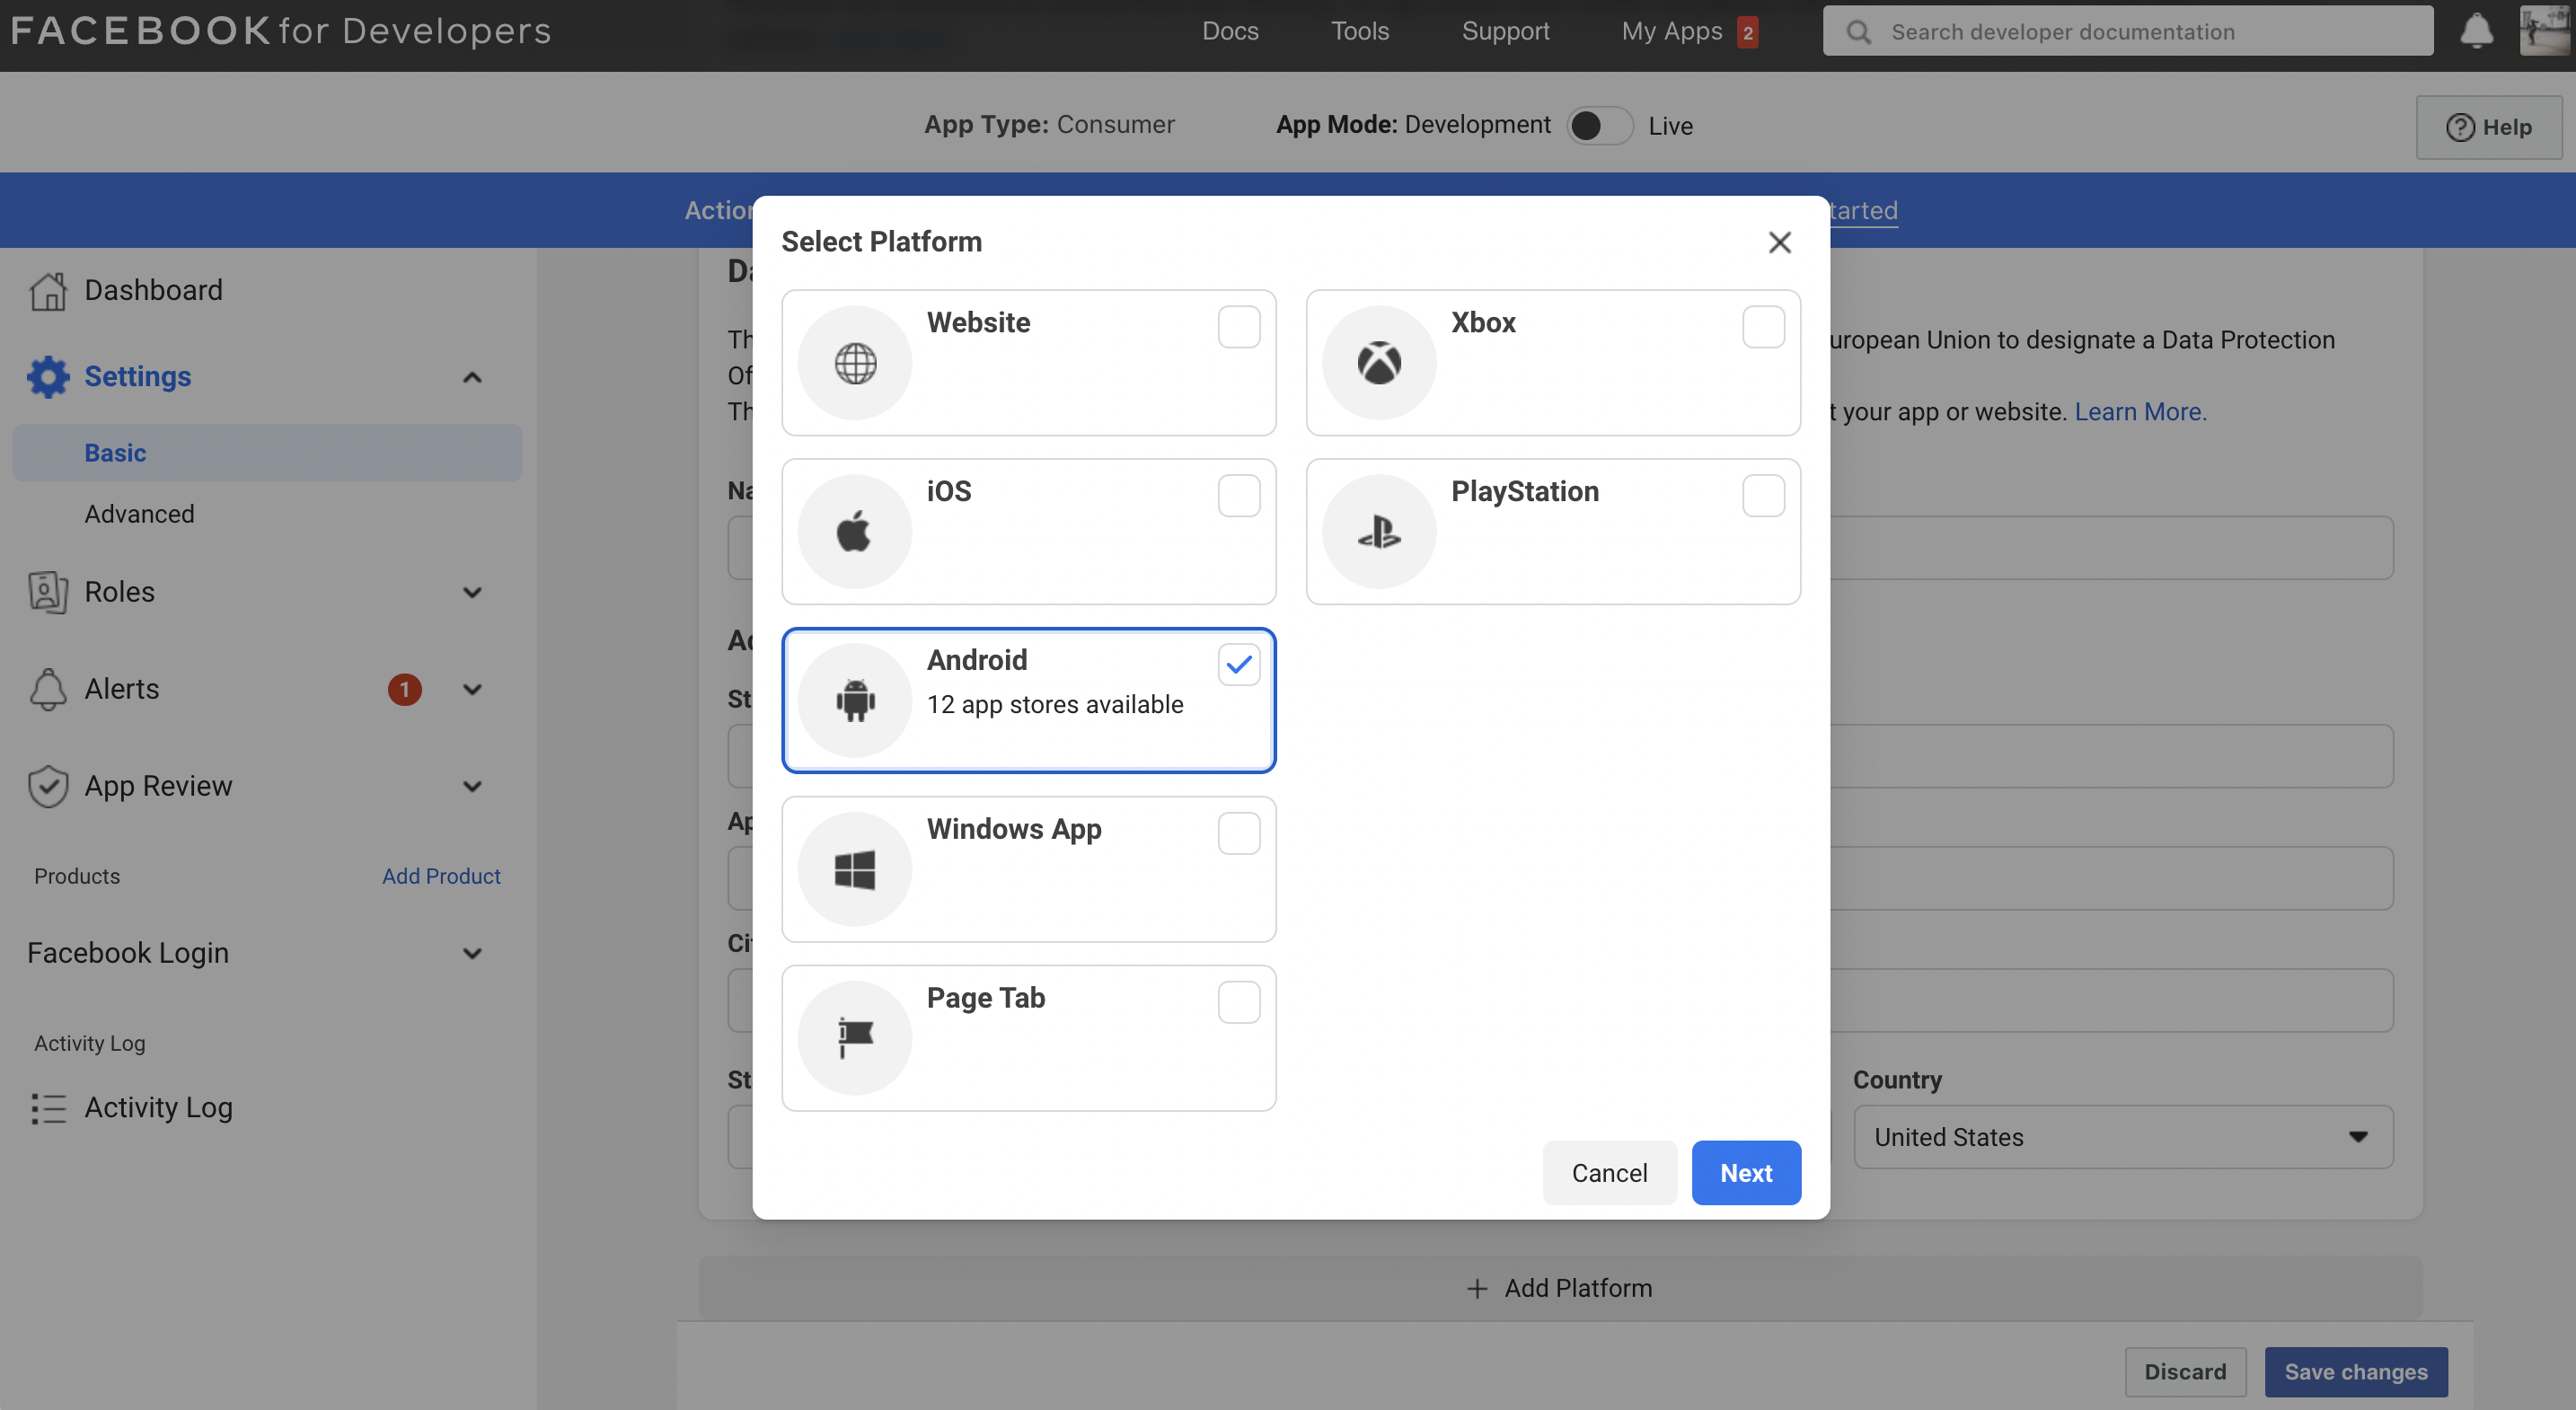
Select Android and click "Next".
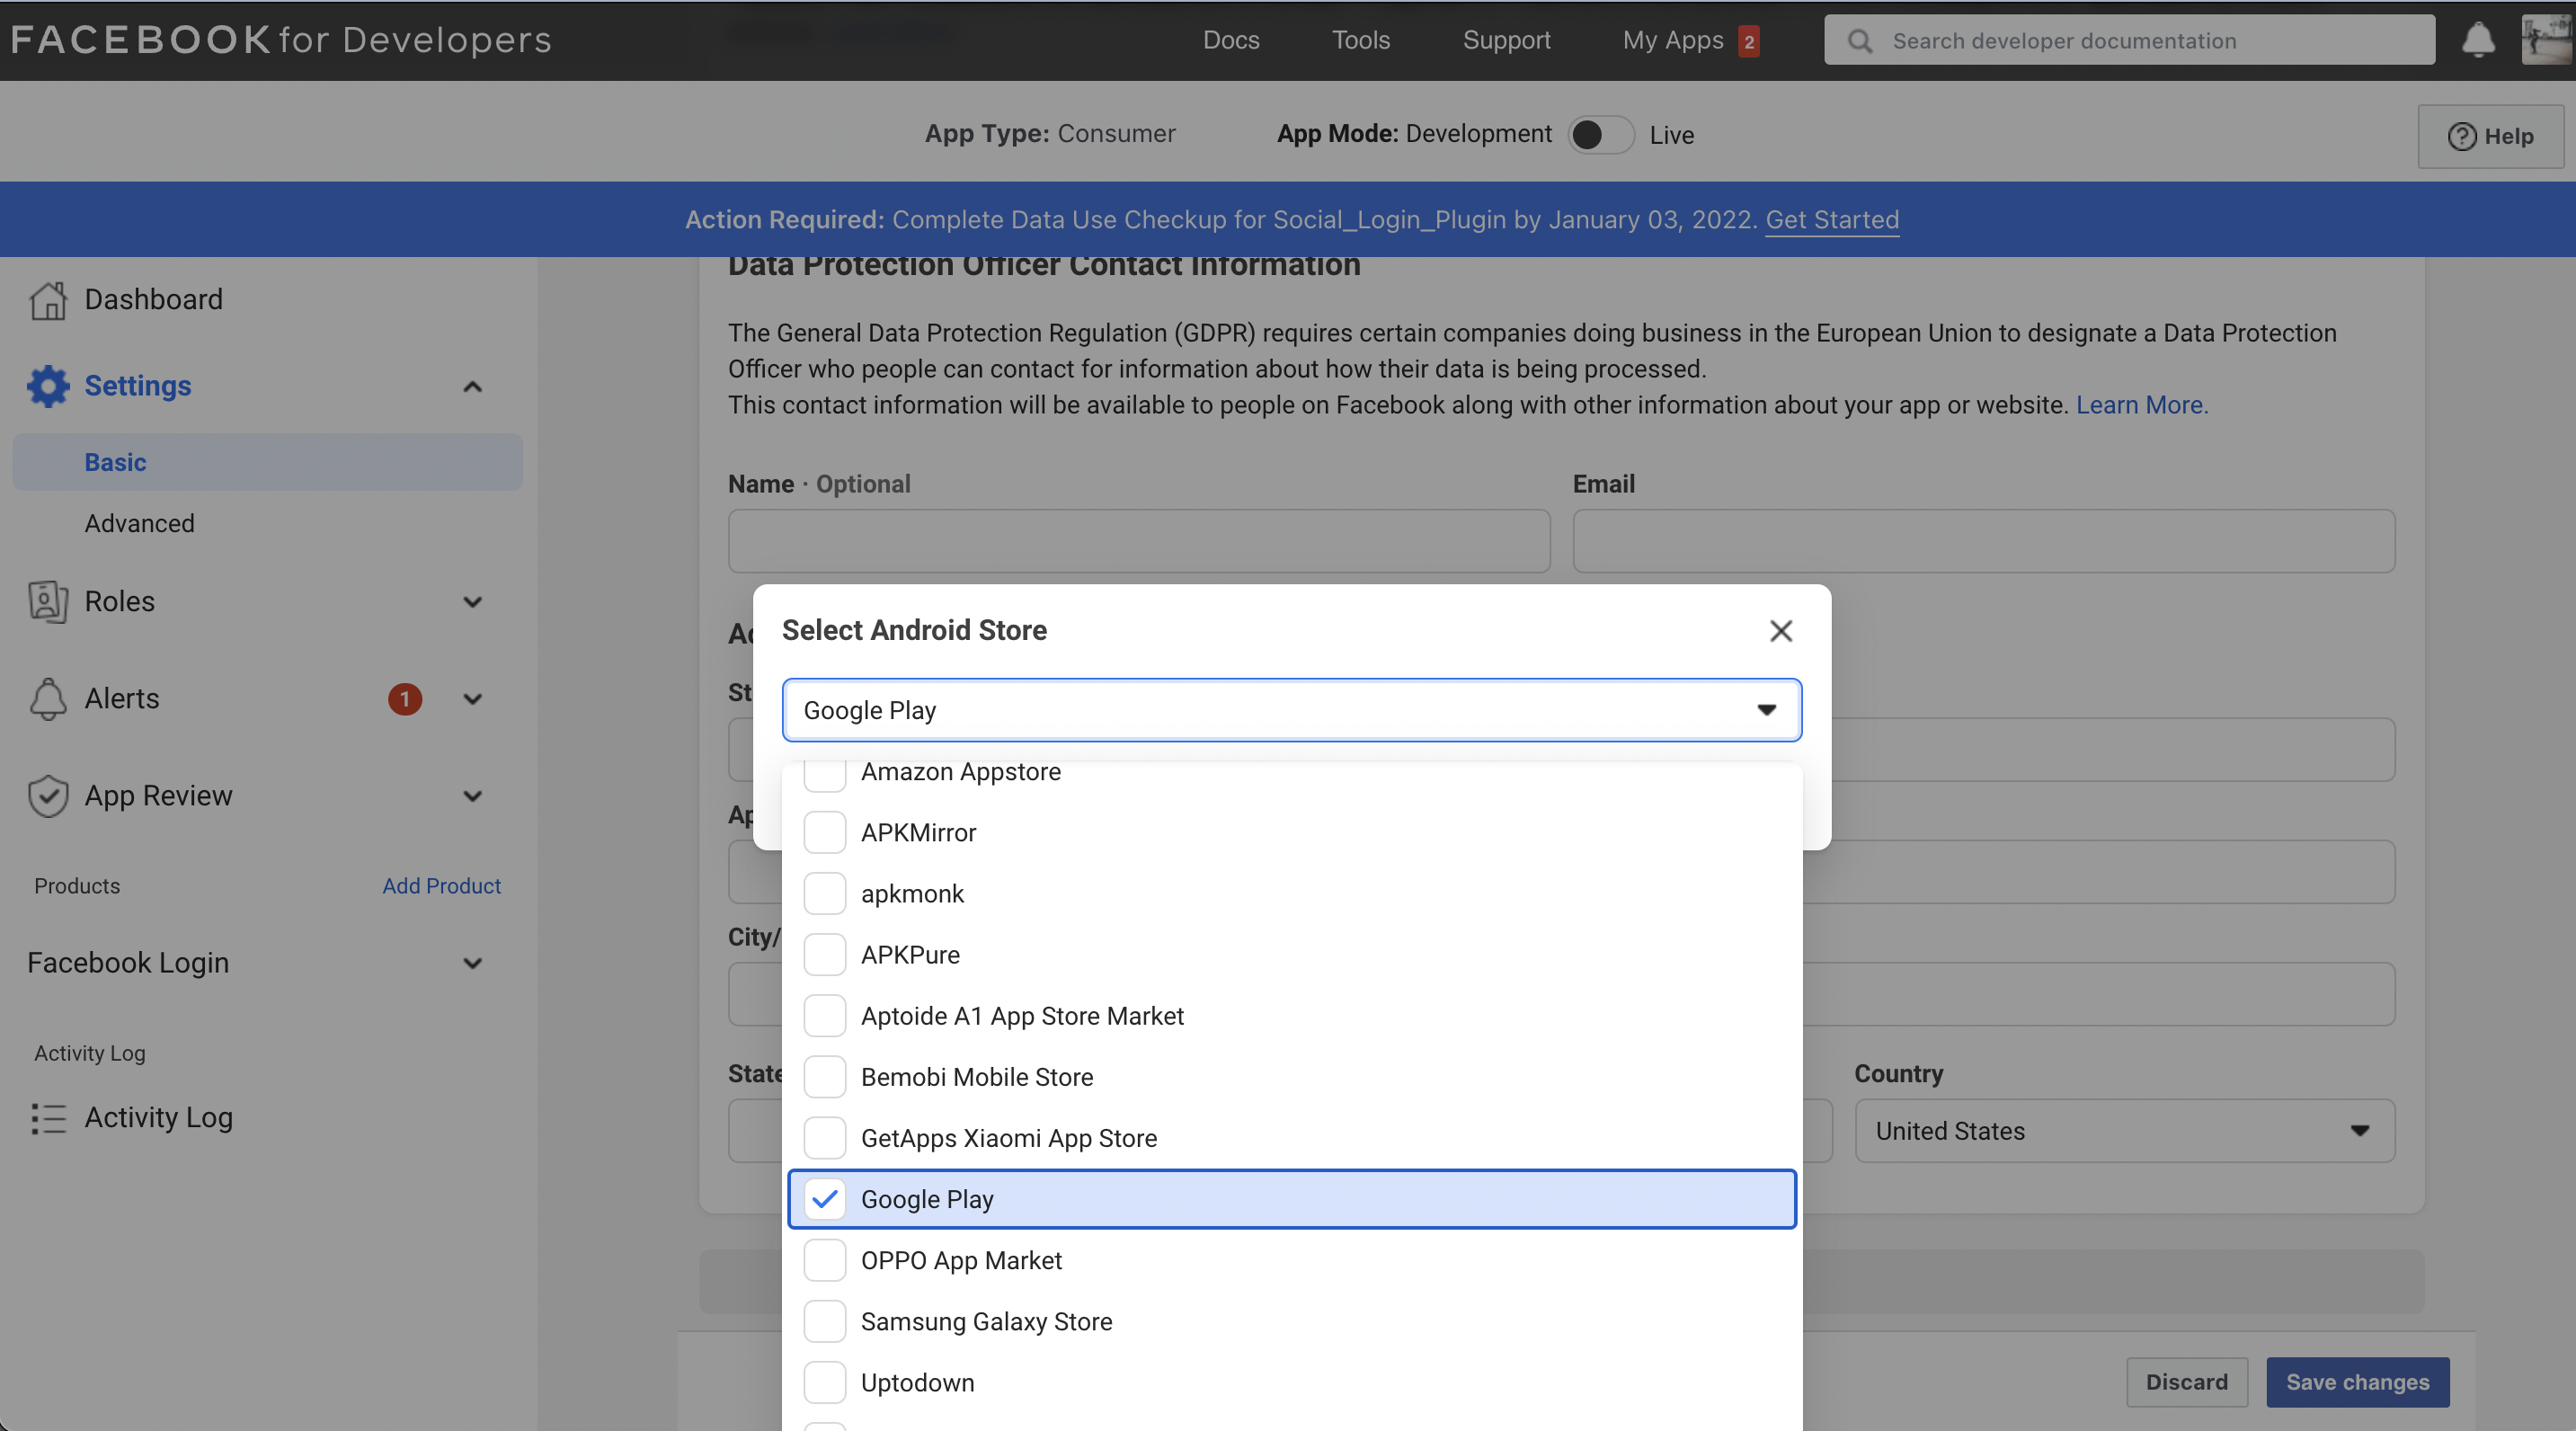
(v) Select the "Google Play" Store. Click on the modal, then "Next".
Step C2. Add Android App Details
Under Android, you will need to add your:
(i) Key Hash
(ii) Package name
(iii) Class Name.
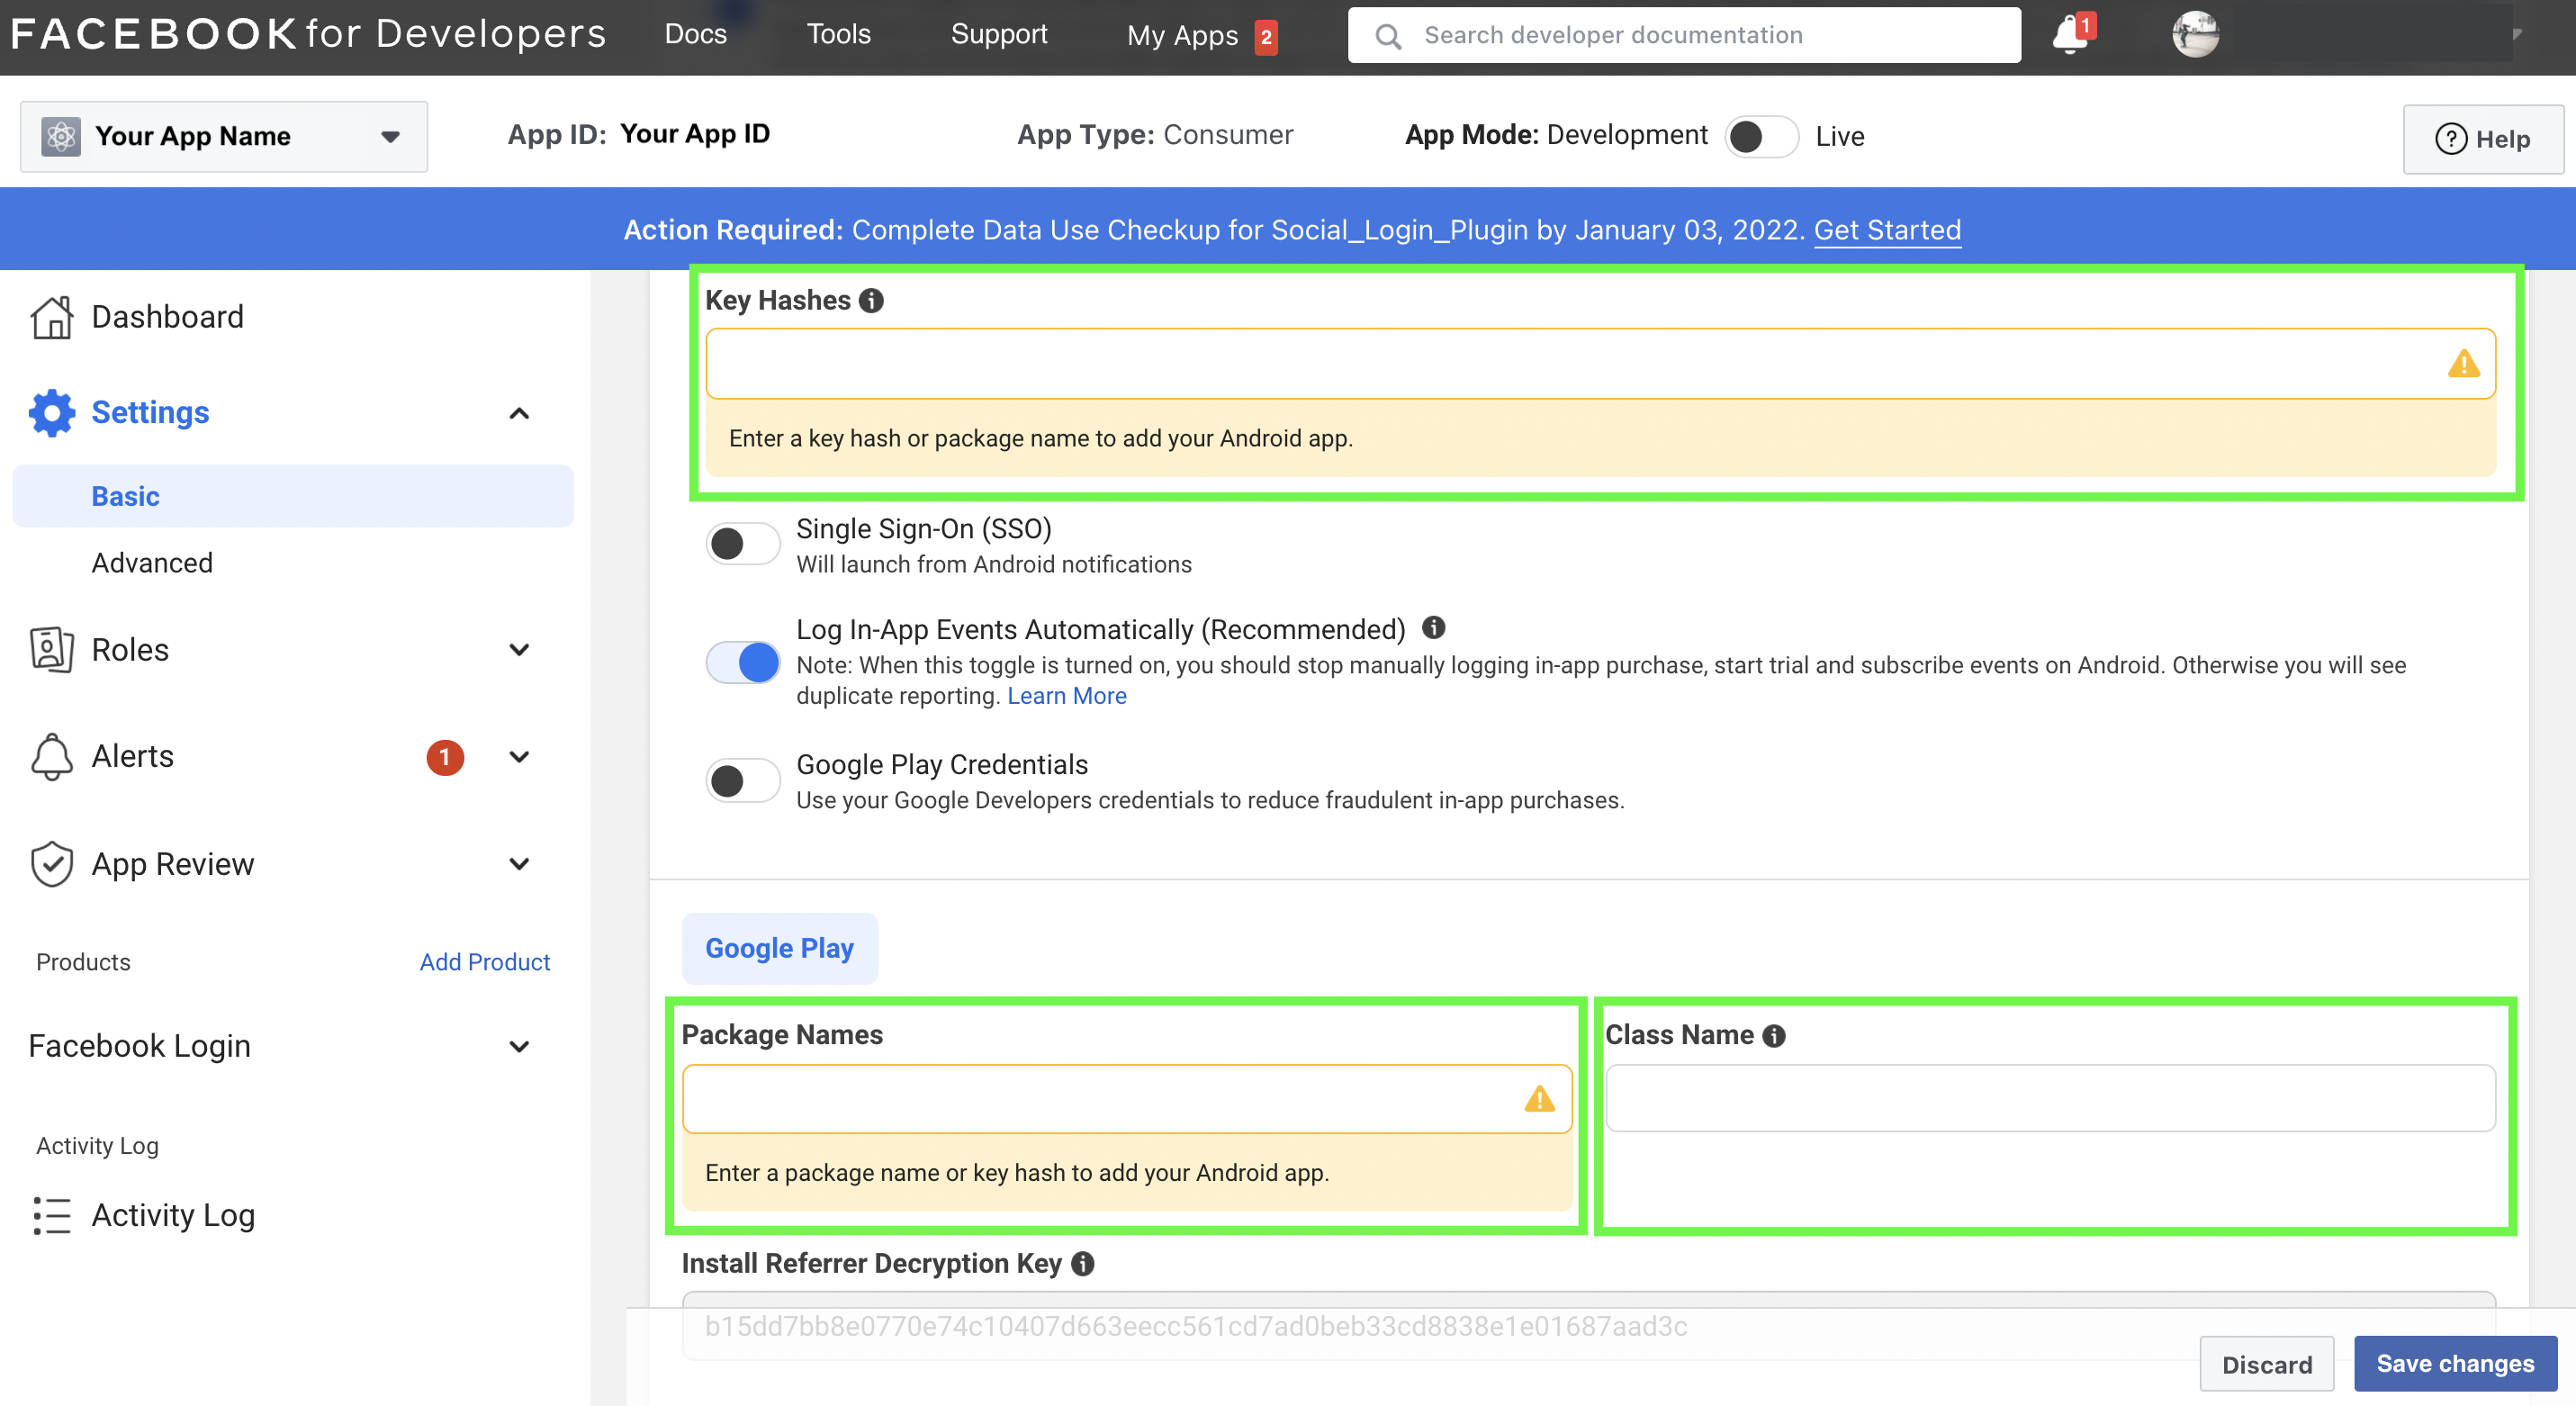
(i) Key Hash.
If you are using Median to sign your Android app contact our team to obtain this value.
If you are using Google Play App Signing first obtain your certificate SHA-1 value from the Google Play Console on the Release > Setup > App Integrity page. Then run the following command which requires a bash console, for further assistance contact the Median team.
echo SHA1VALUE | xxd -r -p | openssl base64
(ii) Package name.
The package name of an Android app uniquely identifies your app on the device, in Google Play Store, and in supported third-party Android stores.
You can find an app's package name in the URL of your app’s Google Play Store listing. For example, the URL of an app page is play.google.com/store/apps/details?id=com.example.app123. The app's package name is:
com.example.app123
Note: If you are building a debug variant in the Android Studio, by default the app build.gradle uses a .debug as an applicationIdSuffix so you will need to append .debug at the end of your package name. For example com.yourcompany.app.debug.
(iii) Class Name. Your Class Name is: co.median.android.MainActivity
Android Facebook Login configuration complete!
Congratulations! You've completed configuring Facebook Login for Android. When you're ready to go Live, go back to your Facebook Developer Apps and set App Mode to Live. Review Step 2 if you haven't configured your Release Key Hash.
Updated 12 months ago